IMPORTANT INFORMATION
This list will be incomplete for at least a decade. If you have information we are missing, please provide it for the sake of all who can utilize this info.
This is not a tier list. Learn from the information and use it to your advantage.
and please don't image quote.
If you have general arcade stick questions, please ask in the "Absolute Question and Answer Thread v.3 (ASK YOUR QUESTIONS HERE!)" thread
http://forums.shoryuken.com/discussion/194283/absolute-question-and-answer-thread-v-3-ask-your-questions-here/p1
If you desire information on other arcade sticks that are not listed here please visit the "What Stick/Controller Should I Buy? Read the Guide on Pg 1 Before Posting." thread
http://forums.shoryuken.com/discussion/137321/what-stick-controller-should-i-buy-read-the-guide-on-pg-1-before-posting/p1
LIST OF ARCADE STICKS IN ORDER OF WHICH THEY APPEAR BELOW
=Hori BlazBlue Chrono Phantasma Extend Arcade Stick
=Hori Fighting Stick Mini 4
=Hori RAP 4 Premium VLX Kuro
=Hori Dead or Alive 5 Last Round (Grouped with RAP 4 Kai and RAP.V Hayabusa sticks due to same/similar base/parts despite not holding the RAP name)
=Hori RAP 4 Kai
=Hori RAP 4 Kai Silent
=Hori RAP.V Hayabusa
=Hori RAP.V Hayabusa (v2)
=Hori RAP.V Silent Hayabusa
=Hori RAP.V Silent Hayabusa (v2)
=Hori RAP.V4
=Hori RAP.V4 Silent
=Mad Catz Alpha Street Fighter V
=Mad Catz TE2 Standard
=Mad Catz TE2 Guilty Gear Xrd -SIGN-
=Mad Catz TE2 Persona 4 Arena Ultimax
=Mad Catz TE2 Ultra Street Fighter IV
=Mad Catz TE2 Ultra Street Fighter IV Rivals
=Mad Catz TE2 Street Fighter V Chun-Li
=Mad Catz TE2+ Street Fighter V Ryu
=Mad Catz TES+ Street Fighter V Shadowloo
=Sanwa/Arc System Works Guilty Gear Xrd -SIGN- Arcade Stick
=Venom/Mayflash Arcade Stick
+ Is a positive feature
- Is a negative feature
= Is neutral or general information
![Categories-Hori.png]()
![Hori-BBCPE-01.png]() Hori BlazBlue Chrono Phantasma Extend Arcade Stick
Hori BlazBlue Chrono Phantasma Extend Arcade Stick
More images (Promo/Stock/BoxFront/BoxBack/Bottom/Interior)-
SRKTT thread-
http://forums.shoryuken.com/discussion/195201/new-hori-blazblue-stick
Release Date-
=Early to Mid 2015 (Unsure of exact month)
Case-
-Hori budget stick case (Same as Fighting Stick V3)
=Width = 335mm, Depth = 230mm, Height (including lever) = 110mm
=Weight (1.5kg)
-No touchpad
-No cord compartment
Metal Panels-
=Top metal panel (standard)
-No bottom metal panel
Plexi/Art-
=Licensed artwork for BlazBlue Chrono Phantasma Extend
=No default plexi
=Plexi options will not likely be available for this stick via 3rd party plexi providers
=Default artwork can leave a sticky residue when removing
Bottom Padding/Feet-
=Small rubber feet
-No padding
Joystick-
-Hori generic joystick listed on Japanese website as "Standard Lever"
-Joystick has individual microswitches not a PCB with 5pin connector
-Difficult to change lever out to Sanwa/Seimitsu without heavy modification detailed
HERE on V3 stick with same base
=PCB may have pin connector for Hayabusa/Sanwa/Seimitsu 5 pin connector (unconfirmed)
Buttons-
=Hori Kuro Buttons
PCB-
=Insufficient information
=PCB may have pin connector for Hayabusa/Sanwa/Seimitsu 5 pin connector (unconfirmed)
=PCB may have pin connector for touchpad (unconfirmed)
Wiring-
=Quick disconnects for buttons and joystick directionals
-Below average wiring (Detailed below)
-No pin headers/connectors for any directionals or action buttons. Wires are soldered into thru hole and glued in place
USB Cable-
=Cable Length (3m)
Unanswered Questions Due to Insufficient Testing-
-PCB needs testing and comparison to existing Hori PCBs
![Hori-FightingStickMini4-01.png]() Hori Fighting Stick Mini 4 for PS4/PS3
Hori Fighting Stick Mini 4 for PS4/PS3
SRKTT thread-
http://forums.shoryuken.com/discussion/204975/hori-fighting-commander-ps3-ps4-pc-xinput-fighting-stick-mini-4-with-hayabusa-like-joystick
More images (Promo/Stock)-
Release Date-
=December 2015
SRK Front Page article -
http://shoryuken.com/2015/11/20/hori-fighting-stick-mini-4-now-available-through-arcade-shock
Case-
-Hori Mini Case (New/Original Design)
=Weight (1 lb)
=Dimensions (7 x 4.8 x 9 inches)
=8 button design
-No touchpad (Assumption based on stock photos and price)
-No cord compartment (Assumption based on stock photos)
Metal Panels-
=Insufficient information
-No metal panels (Assumption based on stock photos and price)
Plexi/Art-
=No default plexi
=Plexi options will not likely be available for this stick via 3rd party plexi providers
Bottom Padding/Feet-
=Insufficient information
-No rubber feet (Assumption based on stock photos)
Joystick-
=Insufficient information
-Budget Hori joystick (Assumption based on price)
Buttons-
=Insufficient information
-Budget Hori buttons (Assumption based on price)
PCB-
=Insufficient information
Wiring-
=Insufficient information
USB Cable-
=Wired
Unanswered Questions Due to Insufficient Testing-
-PCB needs testing and comparison to existing Hori PCBs
![Hori-HRAP4VLX-01.png]() Hori RAP4 Premium VLX
Hori RAP4 Premium VLX
- Real Arcade Pro 4 Premium VLX Kuro for PS4 & PS3
More images (Promo/Stock/Box/Top/Interior/Mods/PCB)-
SRKTT thread-
http://forums.shoryuken.com/discussion/195793/the-hori-ps4-vlx-thread
SRKTT Definitive Hori RAP thread-
http://forums.shoryuken.com/discussion/196423/hori-real-arcade-pro-thread-for-all-versions-in-progress-could-use-your-help-and-input-v2
Case-
Hori VLX Case (Same as VLX models for PS3/360)
=Sizes - Width = 570mm, Depth = 260mm, Height (including lever) = 140mm
=Weight (5.4kg/11.9lbs)
=Interior of case has plenty of space for mounting PCBs
+Touch panel is present
=Has cord compartment but door is flimsy as usual with all sticks
Metal Panels-
+Both top and bottom metal panels
+Replacement metal panels will be offered via
@"Jasen Hicks" of Jasen's Customs
Plexi/Art-
=No default plexi
=Default artwork can leave a sticky residue when removing
=Plexi option is difficult for 3rd party plexi providers to provide due to the dimensions/size of the panel. May be offered by
@"Jasen Hicks" in the future
Bottom Padding/Feet-
=Padding
=Does not include the bonus stability base previously provided with the first 2 runs of VLX Premium sticks
Joystick-
=Hori Hayabusa joystick
Buttons-
=Hori Kuro buttons
PCB-
=Common ground PCB but needs diodes in order to multi-mod. A step by step how to was done by
@yoooooon - I've resized/rehosted the images for backup/archive purposes and the details can also be seen in the below spoiler tag-
Hi guys,
I finally got around to dual modding this for Xbox 360. Man, it's a pain in the ass.
Here's some things to keep in mind if you give this a shot.
1. As mentioned previously, you'll need diodes. I found a suggestion somewhere on SRK saying to use 1N914B diodes, which I bought 300 on eBay for like $8 dollars. Try to avoid overpaying for them since you need at least 15 for one dual mod. Here's an example of ones I've used and they've worked. Someone may have better suggestions. Here's a pic of the pack I bought.
![Hori-HRAP4VLX-DualMod01.png]()
2. The anode (side without the line marker) needs to go towards the hori pcb, and the cathode (the side with the marker) needs to go to a central barrier strip. You'll need I believe 15 of these wires with the diode in line. I would suggest not putting the diode in the middle of the wire and towards one of the sides so that when you cover it up, you'll know the orientation by the placement of the diode. Here's a pic of one I made.
![Hori-HRAP4VLX-DualMod02.png]()
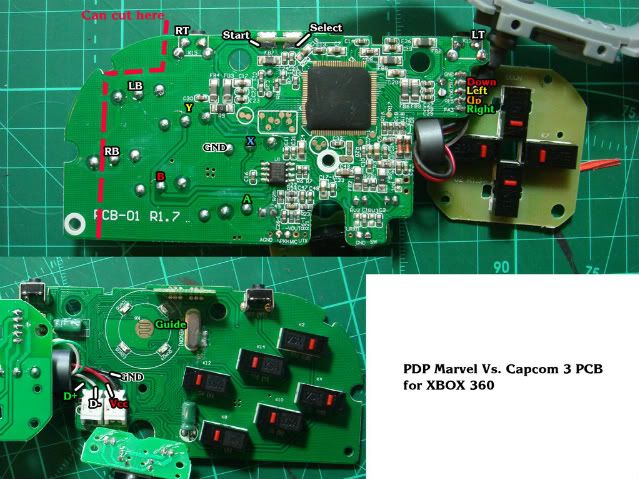
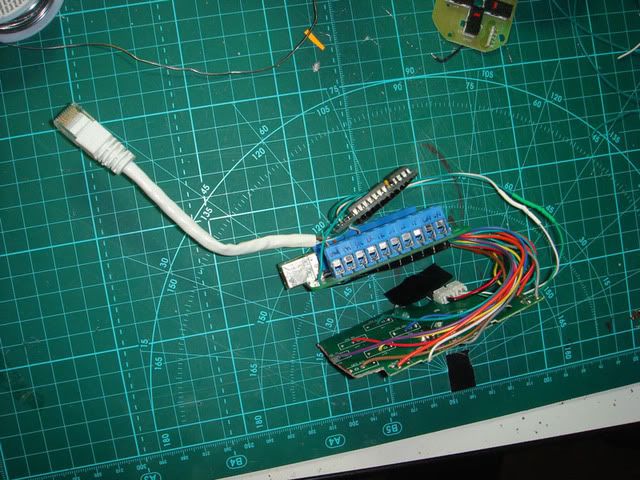
3. Here's how the PCB works. I did this from memory so I need to double check this, but I believe it's correct. One thing to note, the row of pins that are closer to the middle are the signal lines (the points at which you use your diode wires), the grounds and other wires you will not need wires with diodes. Back and PS home you will need diode wires. (Those might be reversed in the picture, but I'm sure it's those two pins.)
![Hori-HRAP4VLX-DualMod03.png]()
4. Instead of wiring to the pins on the PCB, I used a 30-pin header to wire to instead. I personally try to do minimal mods to the actual stick so everything can be reversed back to stock if need be. I know, weird. Here's a sample of what it looks like. I had to use an exacto knife to get this one to fit, but it wasn't too much work.
![Hori-HRAP4VLX-DualMod04.png]()
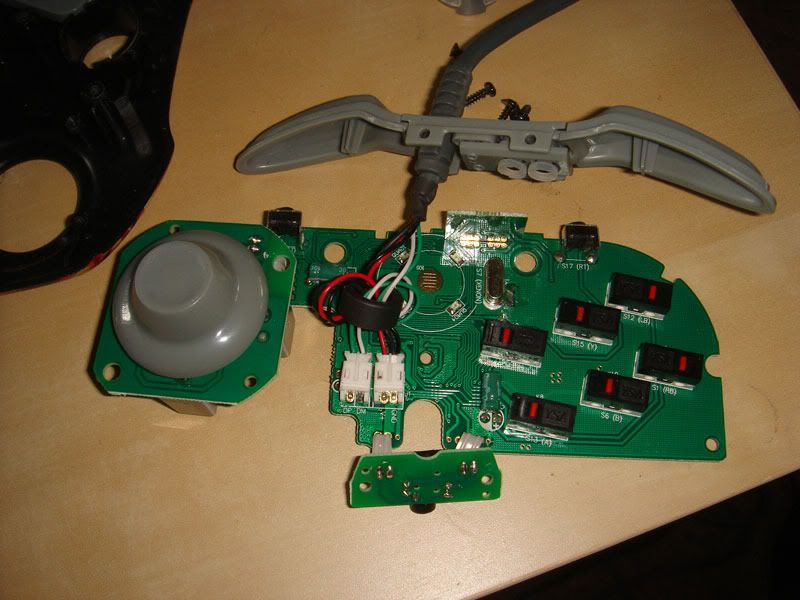
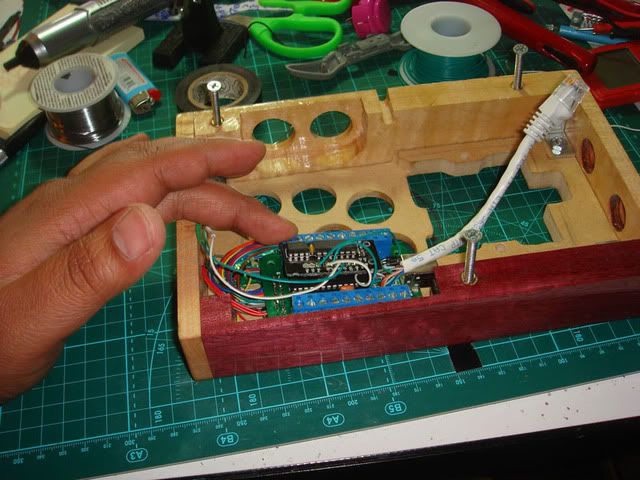
5. Some in progress wiring. The way I had it wired is to have everything lead to a central barrier strip from the two pcbs. This includes signal lines from the HORI pcb (with diodes) and signal lines from the xbox pad linking to the new button and joystick wiring I hooked up. One thing to remember is that for back/select and PS Home to work, you'll have to intercept the signal from the hori pcb from the 4 and 6 wire headers at the top of the pcb. I used a jewelers sized flat head screwdriver to lift up the tab on the wire and pull it out. I then hooked up wire to that and had it go into the button array. Here's some in-progress wiring.
![Hori-HRAP4VLX-DualMod05.png]()
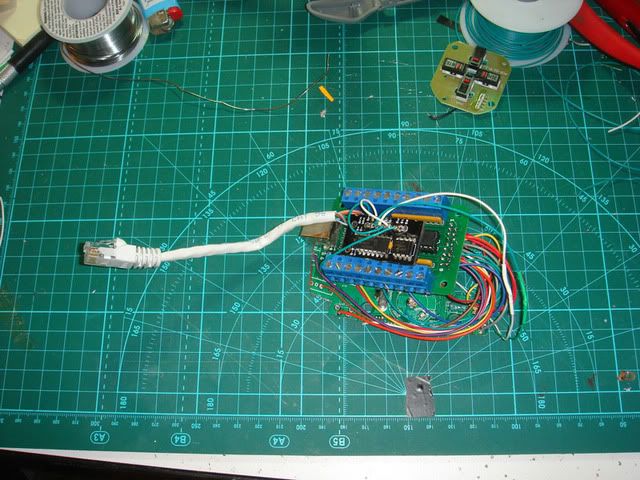
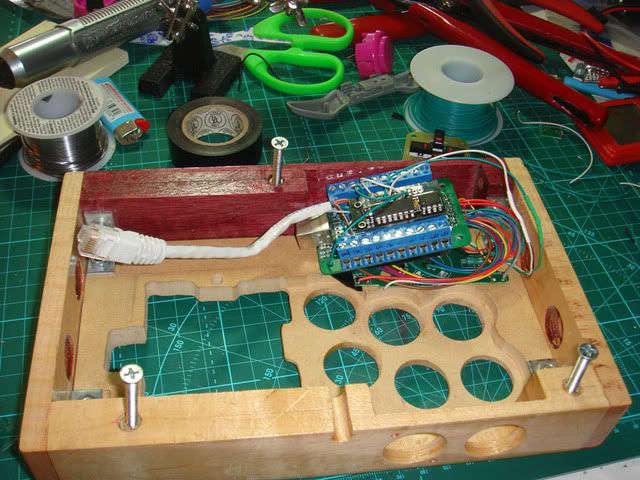
6. Getting close. My wiring is still a rats nest, but something I will eventually clean up. However, EVERYTHING IS WORKING! If you noticed, I used pin headers to wire up the usb cable so I didn't have to cut anything up.
![Hori-HRAP4VLX-DualMod06.png]()
The main reason why I wired it this way with a barrier strip was so that I could easily change out the Xbox 360 pad to any future dual mod pad that I need to without too much headache.
The mod in a nutshell - I believe - you need diodes on the signal lines from the hori pcb, you need a central point at which the two padhacks connect, and you need to do special wiring to the PS Home and back/select button to get those to work. If you don't care about those then you can just leave it as is.
Hope this helps anyone that's looking to give this a try.
Wiring-
=Clean wiring uses very nice quick disconnect ends and an IDE/PATA style ribbon cable from PCB to action buttons and 5 pin joystick connector
USB Cable-
=Wired
=Cable length (3m/9.8ft)
Unanswered Questions Due to Insufficient Testing-
To Edit
![Hori-DoA5LR-01.png]() Hori Dead or Alive 5 Last Round Arcade Stick
Hori Dead or Alive 5 Last Round Arcade Stick
-Hori Dead or Alive 5 Last Round for PS4 & PS3
Not considered a Hori Real Arcade Pro by name, but is the exact same base and PCB as other sticks bearing the RAP in name
More images (Promo/Stock/BoxFront/BoxBack/Bottom/Interior/PCB)-
SRKTT thread-
http://forums.shoryuken.com/discussion/194638/hori-ps4-ps3-dead-or-alive-5-last-round-stick/p1
Release Date-
=Early 2015 (February or March? Unsure of exact month)
Case-
Hori Case (New form factor upgrade from RAPV3/RAPVX/RAPV4 style where buttons are now on the side instead of on top/face)
=One main plastic base. Does not have individual plastic pieces.
=Sizes DoA5LR - Width = 430mm, Depth = 237mm, Height (including lever) = 114mm
=Weight (2.2kg)
=Interior of case has plenty of space for mounting PCBs
=Must open from bottom (Which voids the warranty)
+PS4 touch panel on back
+Analog sticks mounted on front of stick (They are removable by opening up case SEE PHOTOS)
+Cord compartment
Metal Panels-
+Both top and bottom metal panels
=Vewlix layout with standard spread between joystick and buttons
Plexi/Art-
=No default plexi
=Default artwork can leave a sticky residue when removing
=No current 3rd party plexi options. Tek-Innovations may offer in 2016
Bottom Padding/Feet-
=No padding
=Four small rubber feet
Joystick-
=Hori Hayabusa joystick
Buttons-
=Hori Kuro buttons
PCB-
=Unsure if common ground PCB. May exist some type of dual mod issues where signals are held high/low if variable. Needs more research.
=Multiple PCBs (main PCB, side PCB, touch screen)
=Touch screen PCB is connected to main PCB using a small ribbon cable
=Side PCB, joystick, USB cable, and analog sticks are connected to main PCB using standard pin connectors
-Buttons are connected to main PCB by solder and glue
Wiring-
=Typical
USB Cable-
=Wire and cord compartment
=Cable length (3m)
![Hori-HRAP4KAI-01.png]() Hori RAP 4 Kai
Hori RAP 4 Kai
-Hori Real Arcade Pro 4 Kai for PS4 & PS3
More images (Promo/Stock/BoxFront/BoxBack/Bottom/Interior/PCB)-
SRKTT thread (HRAP4Kai)-
HRAP 4 Kai thread was merged with the HRAP.V4 thread.
Go to page 6 to see coverage for the HRAP 4 Kai. The first 5 pages are for the older base model HRAP.V4 and HRAP.V4 Silent
http://forums.shoryuken.com/discussion/189004/hori-hrap-v4-announced-compatible-with-ps3-and-ps4
SRKTT Definitive Hori RAP thread-
http://forums.shoryuken.com/discussion/196423/hori-real-arcade-pro-thread-for-all-versions-in-progress-could-use-your-help-and-input-v2
Case-
Hori Case (New form factor upgrade from RAPV3/RAPVX/RAPV4 style where buttons are now on the side instead of on top/face)
=One main plastic base. Does not have individual plastic pieces.
=Width = 430mm, Depth = 237mm, Height (including lever) = 114mm
=Weight (2.2kg)
=Interior of case has plenty of space for mounting PCBs
=Must open from bottom (Which voids the warranty)
=PS4 touch panel on back
+Cord compartment
Metal Panels-
+Both top and bottom metal panels
=Vewlix layout with wider spread between joystick and buttons
Plexi/Art-
=No default plexi
=Default artwork can leave a sticky residue when removing
=Plexi is available via Tek-Innovations.com
Bottom Padding/Feet-
+Padding on bottom
-No rubber feet
Joystick-
=Hori Hayabusa joystick
Buttons-
=Hori Kuro buttons
PCB-
=Common ground PCB. May exist some type of dual mod issues where signals are held high/low if variable. Need to discuss with modders more.
=Multiple PCBs (main PCB, side PCB, touch screen)
=Touch screen PCB is connected to main PCB using a small ribbon cable
=Side PCB is connected to main PCB using two standard molex style connectors
=Joystick is connected to main PCB using a standard molex style connector
-Buttons are connected to main PCB by solder and glue
=USB cable is connected to main PCB by using a standard molex style connector
Wiring-
=Typical
USB Cable-
=Wire and cord compartment
=Cable length (3m)
![Hori-HRAP4KaiSilent-01.png]() Hori RAP 4 Kai Silent
Hori RAP 4 Kai Silent
-Hori Real Arcade Pro 4 Kai Silent for PS4 & PS3
More images (Promo/Stock/BoxFront/BoxBack/Bottom/Interior/PCB) COMING SOON NOT DONE YET -
insert extra photos here
SRKTT thread-
Go to page 6 to see coverage for the HRAP 4 Kai and it's Silent twin. The first 5 pages are for the older base model HRAP.V4 and HRAP.V4 Silent
http://forums.shoryuken.com/discussion/189004/hori-hrap-v4-announced-compatible-with-ps3-and-ps4
SRKTT Definitive Hori RAP thread-
http://forums.shoryuken.com/discussion/196423/hori-real-arcade-pro-thread-for-all-versions-in-progress-could-use-your-help-and-input-v2
Case-
Hori Case (New form factor upgrade from RAPV3/RAPVX/RAPV4 style where buttons are now on the side instead of on top/face)
=One main plastic base. Does not have individual plastic pieces.
=Width = 430mm, Depth = 237mm, Height (including lever) = 114mm
=Weight (2.2kg)
=Interior of case has plenty of space for mounting PCBs
=Must open from bottom (Which voids the warranty)
=PS4 touch panel on back
+Cord compartment
Metal Panels-
+Both top and bottom metal panels
=Vewlix layout with wider spread between joystick and buttons
Plexi/Art-
=No default plexi
=Default artwork can leave a sticky residue when removing
=Plexi is available via Tek-Innovations.com
Bottom Padding/Feet-
+Padding on bottom
-No rubber feet
Joystick-
=Hori Hayabusa joystick with optical PCB
Buttons-
=Hori Kuro buttons with silencer pads
PCB-
=Common ground PCB. May exist some type of dual mod issues where signals are held high/low if variable. Need to discuss with modders more.
=Multiple PCBs (main PCB, side PCB, touch screen)
=Touch screen PCB is connected to main PCB using a small ribbon cable
=Side PCB is connected to main PCB using two standard molex style connectors
=Joystick is connected to main PCB using a standard molex style connector
-Buttons are connected to main PCB by solder and glue
=USB cable is connected to main PCB by using a standard molex style connector
Wiring-
=Typical
USB Cable-
=Wire and cord compartment
=Cable length (3m)
![Hori-HRAPVHAYABUSA-01.png]()
![Hori-HRAPVHAYABUSAv2-01.png]()
![Hori-HRAPVSilent-01.png]()
![Hori-HRAPVSilentv2-01.png]() Hori RAP.V
Hori RAP.V
-Hori Real Arcade Pro.V Hayabusa for PS4 & PS3 (version 1 - Kuro buttons)
-Hori Real Arcade Pro.V Hayabusa for PS4 & PS3 (version 2 - Hayabusa buttons)
-Hori Real Arcade Pro.V Silent Hayabusa for PS4 & PS3 (version 1 - Kuro buttons)
-Hori Real Arcade Pro.V Silent Hayabusa for PS4 & PS3 (version 2 - Hayabusa buttons)
SRKTT thread-
Go to page 6 to see coverage for the HRAP V Hayabusa (version 1). The first 5 pages are for the older base model HRAP.V4 and HRAP.V4 Silent
http://forums.shoryuken.com/discussion/189004/hori-hrap-v4-announced-compatible-with-ps3-and-ps4
SRKTT Definitive Hori RAP thread-
http://forums.shoryuken.com/discussion/196423/hori-real-arcade-pro-thread-for-all-versions-in-progress-could-use-your-help-and-input-v2
Case-
Hori Case (New form factor upgrade from RAPV3/RAPVX/RAPV4 style where buttons are now on the side instead of on top/face)
=One main plastic base. Does not have individual plastic pieces.
=Width = 430mm, Depth = 237mm, Height (including lever) = 114mm
=Weight (2.2kg)
=Interior of case has plenty of space for mounting PCBs
=Must open from bottom (Which voids the warranty)
=PS4 touch panel on back
+Cord compartment
Metal Panels-
+Both top and bottom metal panels
=Vewlix layout with standard spread between joystick and buttons
Plexi/Art-
=No default plexi
=Default artwork can leave a sticky residue when removing
=No 3rd party plexi options yet. Tek-Innovations may offer in future
Bottom Padding/Feet-
=No padding
=Four small rubber feet
Joystick-
=Hori Hayabusa joystick
=RAP.V Silent uses optical switches with a Hori Hayabusa joystick
Buttons-
=Hori Kuro buttons
=RAP.V Silent uses foam pads inside the normal Hori Kuro buttons
=RAP.V Hayabusa (version 2) uses new Hayabusa buttons which have a matte finish
PCB-
=Common ground PCB. May exist some type of dual mod issues where signals are held high/low if variable. Need to discuss with modders more.
=Multiple PCBs (main PCB, side PCB, touch screen)
=Touch screen PCB is connected to main PCB using a small ribbon cable
=Side PCB is connected to main PCB using two standard molex style connectors
=Joystick is connected to main PCB using a standard molex style connector
-Buttons are connected to main PCB by solder and glue
=USB cable is connected to main PCB by using a standard molex style connector
+XInput is active on the PCB for HRAP.V Hayabusa (Version 2) and will likely be present on the HRAP.V Silent Hayabusa (Version 2) as well
Wiring-
=Typical
USB Cable-
=Wire and cord compartment
=Cable length (3m)
![Hori-HRAPv4-01.png]()
![Hori-HRAPv4SILENT-01.png]() Hori RAP V4 - Hori RAP V4 Silent
Hori RAP V4 - Hori RAP V4 Silent
-Hori Real Arcade Pro.V4 Hayabusa for PS4 & PS3
-Hori Real Arcade Pro.V4 Silent Hayabusa for PS4 & PS3
SRKTT thread-
http://forums.shoryuken.com/discussion/189004/hori-hrap-v4-announced-compatible-with-ps3-and-ps4
SRKTT Definitive Hori RAP thread-
http://forums.shoryuken.com/discussion/196423/hori-real-arcade-pro-thread-for-all-versions-in-progress-could-use-your-help-and-input-v2
Modding guide/documentation via
@Darksakul -
http://forums.shoryuken.com/discussion/comment/8852461/#Comment_8852461
Case-
Hori Case (Same as RAPV3/RAPVX/UMvC3/DoA models for PS3/360)
=One main plastic base. Does not have individual plastic pieces.
=Sizes - Width = 430mm, Depth = 240mm, Height (including lever) = 125mm
=Weight (2.2kg)
=Interior of case has plenty of space for mounting PCBs
=Must open from bottom (Which voids the warranty)
Metal Panels-
+Both top and bottom metal panels
Plexi/Art-
=No default plexi
=Default artwork can leave a sticky residue when removing
+Tek Innovations does have plexi option (Same as V3/VX non-Kai)
Bottom Padding/Feet-
=No padding
=Four small rubber feet
Joystick-
=RAP v4 Silent uses optical switches with a Hori Hayabusa joystick
=RAP v4 Standard uses microswitches with a Hori Hayabusa joystick
Buttons-
=RAP v4 Standard uses normal Hori Kuro buttons
=RAP v4 Silent uses foam pads inside the normal Hori Kuro buttons
PCB-
=Common ground. Unsure if active high/low. Unsure if able to multi-mod without complications due to insufficient testing.
+Easy to remove main PCB from base
=Button signals/grounds, and USB cable are soldered to PCB while joystick connector and ribbon cables to Turbo/Home PCB are removable from main PCB
Wiring-
=Typical
USB Cable-
=Wire and cord compartment
![Categories-Madcatz.png]()
![Madcatz-ALPHA-01.png]() Madcatz Street Fighter V FightStick ALPHA for PS4/PS3
Madcatz Street Fighter V FightStick ALPHA for PS4/PS3
![Madcatz-TE2-Standard-01.png]()
![Madcatz-TE2-GG-01.png]()
![Madcatz-TE2-P4AU-01.png]()
![Madcatz-TE2-USFIV-01.png]()
![Madcatz-TE2-Rivals-01.png]()
![Madcatz-TE2-SFVChunLi-01.png]()
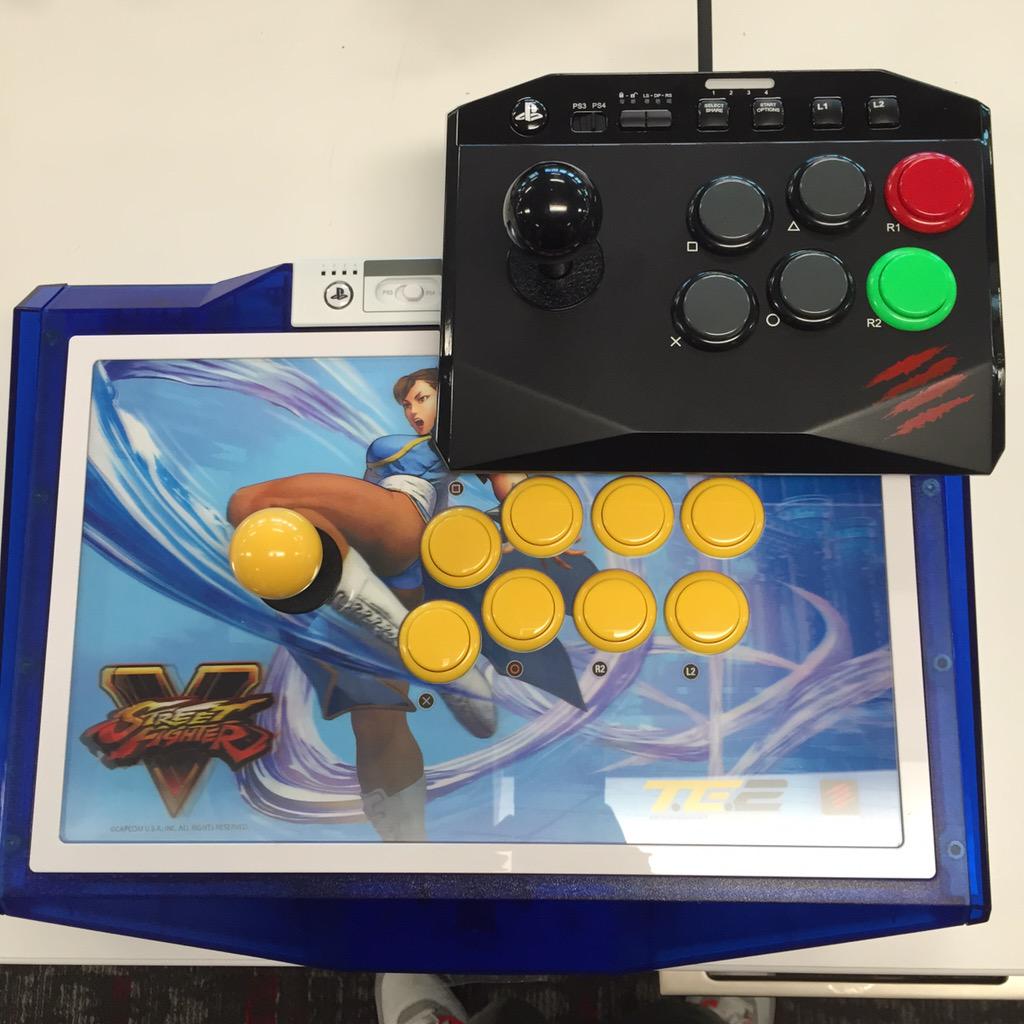
![Madcatz-TE2-SFVRyu-01.png]() Madcatz TE2 USFIV/GGXrd/P4AU
Madcatz TE2 USFIV/GGXrd/P4AU
-Mad Catz Arcade FightStick Tournament Edition 2 for PS4 & PS3
-Mad Catz Guilty Gear Xrd -SIGN- Arcade FightStick Tournament Edition 2 for PS4 & PS3
-Mad Catz Persona 4 Arena Ultimax Arcade FightStick Tournament Edition 2 for PS4 & PS3
-Mad Catz Ultra Street Fighter IV Arcade FightStick Tournament Edition 2 for PS4 & PS3
-Mad Catz Ultra Street Fighter IV Arcade FightStick Tournament Edition 2 for PS4 & PS3 Rivals
-Mad Catz Street Fighter V Arcade FightStick Tournament Edition 2 Chun-Li for PS4 & PS3
-Mad Catz Street Fighter V Arcade FightStick Tournament Edition 2+ for PS4 & PS3 (Ryu Artwork)
SRKTT thread-
http://forums.shoryuken.com/discussion/190326/official-usfiv-ggxrd-p4u-te2-thread
Case-
TE2 Case (Same on XB1/PS3/PS4/360 versions)
=Weight (Unknown)
=Width/Length/Height with Balltop (Unknown)
=Base consists of multiple heavy duty plastic pieces screwed together
=Interior of case has roughly 5.5cm of height space for mounting PCBs and/or storage
=Side hinge clasps are metal, front hinge clasp is plastic
+Hinges can be nice for replacing parts and storage for extra buttons etc
+Comes with reversible screwdriver flat/hex for maintenance needs
+Replacement sides and bezels offered on Madcatz website for customization options
+Same design/production base by major company for multiple consoles and releases means there will be plenty 3rd party customization options in the future
+Curve of base on back makes it difficult to accidentally press the arcade stick against an object and hit the Start/Select buttons
-Hinges don't clasp as solid as they should causing a small give with pressure
Metal Panels-
+Both top and bottom metal panels
-Sanwa/Seimitsu screw-ins not compatible with Kick1 due to nut being in way of joystick mounting plate unless you pry up the end of mounting plate
Plexi/Art-
=Multiple types of default plexis depending on which stick was purchased and when it was purcahsed (Will be referred to as Old Plexi and New Plexi)
=Default plexi goes around the buttons instead of under them. This has both advantages and disadvantages as listed below
+All Default Plexi: Default plexi easy to remove for replacing artwork without having to remove wires/quickdisconnects/buttons
-All Default Plexi: Default plexi doesn't always sit 100% securely as it's not being held down by buttons
=Default Old Plexi is 1/8" thick in the center but 1/16" thick along the sides where the border/bezel sits on top
+Default Old Plexi: (needs advantages listed here)
-Default Old Plexi: (needs disadvantages listed here)
=Default New Plexi is 1/32" thick and is placed under the bezel
+Default New Plexi: (needs advantages listed here)
-Default New Plexi: (needs disadvantages listed here)
=Tek Innovations does have replacement plexi option 1/16 thickness that sits underneath the buttons and bezel. 1/32 thickness will be offered in future.
Bottom Padding/Feet-
=Has a foam padding
=Does not have feet
+Good for lap
-Slides a bit on hard flat surfaces
Joystick-
+Sanwa JLF-TP-8YT
Buttons-
+Sanwa OBSF-30 and OBSF-24
-These buttons utilize clear rings that allow the button to rise and be flush with the clear top panel
-A few reported issues of stock buttons being shipped with broken or loose tabs likely due to rough installation during assembly.
PCB-
+Common ground. Possible to multi-mod.
+Removable plastic cover from internal USB plug allows removal of PCB easy which neutralizes any issue of short USB wires soldered to bottom of PCB.
+LED PCB (Basic) is offered on Madcatz website for customization options
+LED PCB aka "LVT3" (Super customizable) is offered by Paradise Arcade Shop for customization options
+Touchpad is present on the new SFV TE2+ model with Ryu art (Unsure if this will be common for future TE2 sticks)
Wiring-
+Clean wiring using an PATA/IDE style ribbon cable connector on PCB to 20 color coded wires (10 signal 10 ground) to buttons.
=Quick disconnects have a tab on them. This has both advantages and disadvantages as listed below.
+You won't experience a quick disconnect becoming loose due to the tab
-Pressing down release tab on each individual wire can be tough for those with big fingers and is much more difficult to remove than usual disconnects
USB Cable-
=Removable proprietary "ProCable" using a circular 5 pin DIN style connector. This has both advantages and disadvantages as listed below
=Screws into connector on back of arcade stick base. Can prevent disconnection of signal if cord is pulled which can be good or bad depending on situation.
+Removable cable
-Must order ProCable replacements from Madcatz. May have luck finding as "MLG ProCable"
=Replacement connector to make your own ProCables may be "Model PMDX-5Pin" (Unconfirmed)
![Madcatz-TESPlus-Shadowloo-01.png]() Madcatz Street Fighter V Arcade FightStick Tournament Edition S+ for PS4 & PS3
Madcatz Street Fighter V Arcade FightStick Tournament Edition S+ for PS4 & PS3
SRKTT thread-
=Insufficient information
Release Date-
=Insufficient information
SRK Front Page article -
http://shoryuken.com/2015/12/03/mad-catz-unveils-line-of-street-fighter-v-arcade-sticks-fightpads/
Case-
Madcatz TE/TE-S base modified from original base (Unsure how different interior plastic mold base is yet)
=Weight (Unknown)
=Dimentions (Unknown)
=8 button Vewlix design
Metal Panels-
+Both top and bottom metal panels
-Sanwa/Seimitsu screw-ins not compatible with Kick1 due to nut being in way of joystick mounting plate unless you pry up the end of mounting plate
Plexi/Art-
=No default plexi
=Plexi options from 3rd party supplies like Tek Innovations is possible but due to new turbo area may have to be remeasured
=If you choose to remove the turbo area, mount PCB in interior of case, and make buttons for Home/Turbo/L3/R3/Touchpad etc elsewhere on case, you could
get the existing TE/TE-S plexi option from Tek Innovations with no turbo area cut and it should fit properly. Will have to verify the joystick and button holes are exact same as previous TE1/TE-S models
Bottom Padding/Feet-
=Unsure if has padding on bottom
=Does appear to have feet in stock photos
Joystick-
+Sanwa JLF-TP-8YT
Buttons-
+Sanwa OBSF-30 & OBSF-24
PCB-
=Insufficient information
Wiring-
=Insufficient information
USB Cable-
=Wired
=Unknown if cable is removable
![Categories-ArcSystemWorksSanwa.png]()
![Sanwa-GuiltyGear-00.png]() Sanwa/Arc System Works Guilty Gear Xrd -SIGN- Arcade Stick
Sanwa/Arc System Works Guilty Gear Xrd -SIGN- Arcade Stick (Unsure if official name)
![Categories-Venom.png]()
![Venom-01.png]() Venom Arcade Stick (Made by Mayflash?)
Venom Arcade Stick (Made by Mayflash?)
SRKTT thread-
http://forums.shoryuken.com/discussion/195434/venom-arcade-stick-ps4-ps3
Guide newbie thread on how to customize/mod-
http://forums.shoryuken.com/discussion/202199/newbie-guide-venom-ps4-full-sanwa-mod-with-octo-for-116-uk-pricing
Case-
Existing retail photos look like same build to the Mayflash V2 arcade stick for PS3/360/PC
=Width = 320mm, Depth = 260mm, Height = 120mm
=Weight (2.1kg)
=Has cord compartment
Metal Panels-
+Both top and bottom metal panels
+Top metal panel has grooves for button tabs for easy install/remove
Plexi/Art-
+Has default plexi for custom artwork insertion
+Stock artwork isn't glued or attached to default stock plexi
=Same artwork template as Mayflash v2 -
https://mega.co.nz/#!iUUQ0IYY!mYbNwtx3nUbrFTjXnUYf067g4lVwB-hDRMdfJzwppbA
Bottom Padding/Feet-
=Has a foam padding on corners
=Does not have feet
Joystick-
=Default Non-branded joystick of average quality with individual microswitches (Microswitch brand unknown)
=Default joystick compatible with Sanwa gates
Buttons-
-Stock Sanwa knockoff buttons of bad quality
=Microswitches use a Seimitsu PS14-G clone switch. It has a very similar feel, the same QD placement, and the same thin microswitch plunger as Seimitsu.
+Easy to replace stock buttons with any standard 30mm button
PCB-
=Common ground PCB
=Has 3 PCBs. One main, one for Start/Select/Turbo/etc, and one for LEDs
Wiring-
=Quick disconnects for action buttons
-Soldered on microswitches for joystick
-Stock joystick wiring to PCB is to 4 individual 2pin connectors and PCB has empty 5pin connector for joystick. This means replacing joystick requires splice of existing wires to 2pin connectors or usage of 5pin connector.
USB Cable-
=Cable Length (3m)
=Utilizes 5pin connector to PCB
===Things I need to edit on this post include===
=Shitloads of pictures of each joystick from stock to interior to PCB etc
=More Information! FEED ME INFO! NEED MORE EXP POINTS FOR KNOWLEDGE LEVEL UP!