Quantcast
Channel: Tech Talk — shoryuken
Viewing all 5515 articles
Browse latest View live

Dual Shock 4 PadHack Thread - aka you should padhack the hfc4 pad instead.

$
0
0
UPDATE: Just padhack a hori fighting commander 4 instead.


So you want to add PS4 functionality to your arcade stick? Well too bad. Just wait until there is a third party pcb that is cheap and easy to wire up. Maybe we'll get lucky and there will be a firmware update to any of the
custom ps3 pcb's that are out in the market. Oh, you don't want to wait? You really want it now? Well the only option right now is to padhack a Dual Shock 4 controller. Luckily for us the pcb is common ground. Unluckily for us
the pcb is a pain in the ass to wire up and is quite unforgiving if you mess up. You thought the Xbox One pad hack was hard? This pad hack shits all over it. You accidentally burn off or rip off a contact pad on the ds4 and
you've just wasted $60. The only option after that is to find a via that traces to the contact pad that you've just destroyed. They are not easy to find nor solder to.

So if you think you have the skills or are looking for a challenge you have been warned. Don't hold me responsible if you damage your DS4.

With that being said, let the padhack begin! We will start out with preparing the ds4 pcb.

To begin opening up the DS4 you must unscrew the four screws on the back of the pad.
IMG_0336_zps442ab332.jpg

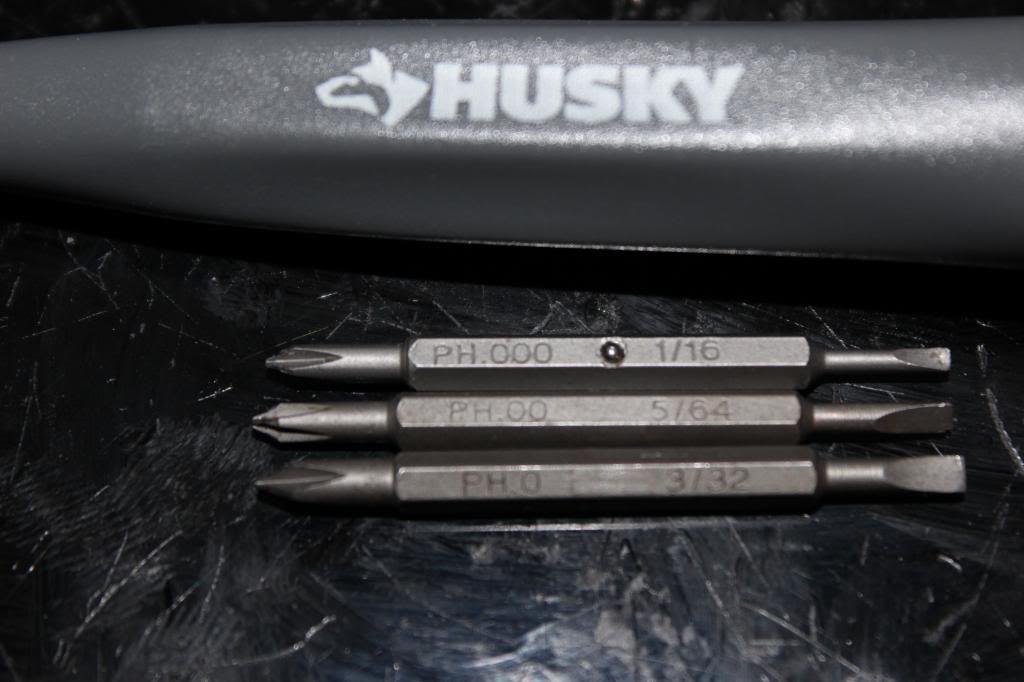
You'll need to use a size #0, #00, or #000 Phillips head screwdriver. If you don't own one then I suggest buying a Husky precision screwdriver set.
IMG_0337_zps65fe8af9.jpg

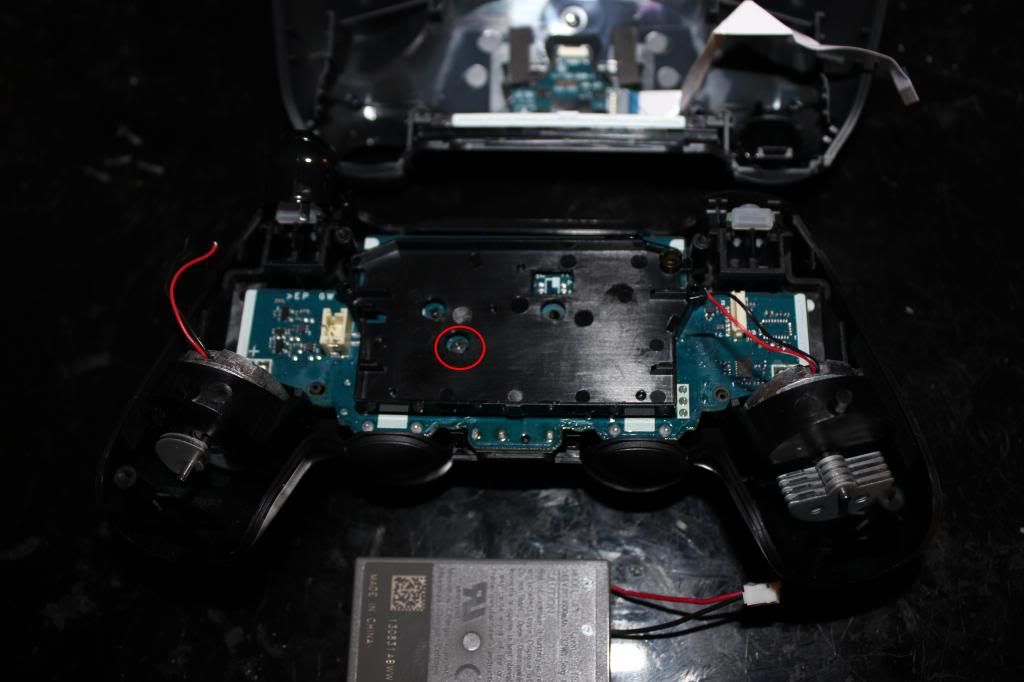
You'll need to use a little force to pull apart the shell, but don't pull the shells too far apart too fast. There is a ribbon cable connecting the usb jack to the ds4 pcb. Pull the ribbon cable out first. Then unplug the

lithium ion battery pack. Then cut off the rumble motor wires.
IMG_0338_zps823d7882.jpg

Circled is one more screw that holds the pcb to the shell.
IMG_0339_zpsced0a56e.jpg

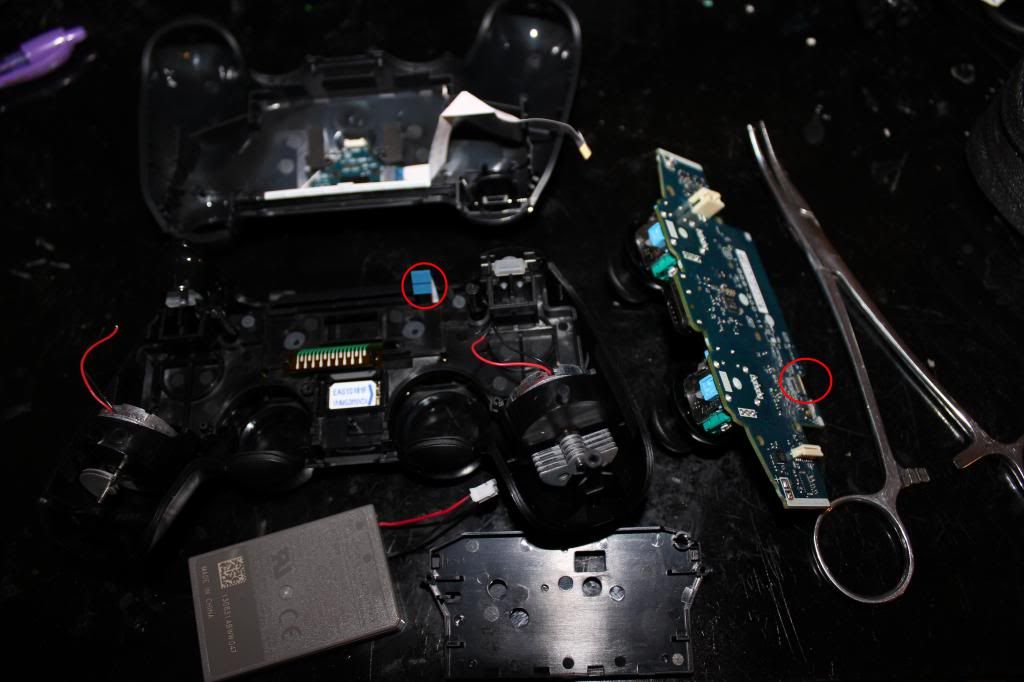
Be careful as you lift the pcb out. There is still one more ribbon cable left that needs to be unplugged. It might be a bit difficult to unplug with your finger so using tweezers or forceps will make things easier.
IMG_0340_zpsde1f7a4d.jpg

If you have very tight space limitations inside your case you'll probably will want to desolder the analog jacks and neutralize the axis with 10k ohm resistors. However, for most applications just cutting the stubs and gluing
the stick in place will suffice.
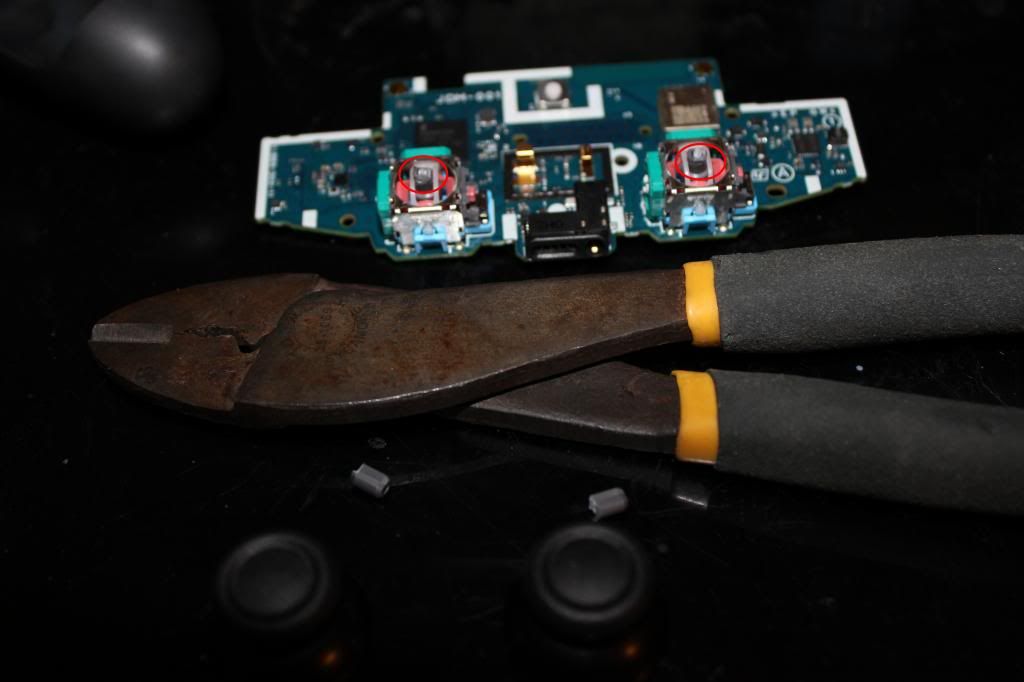
IMG_0341_zpsb1f0d7c5.jpg

If you want to use the micro usb jack, and I suggest you do, then you'll need to unscrew four screws that hold it in place. The top two have to be removed first. Then the led light thingy can be removed to gain access to the
bottom two screws.
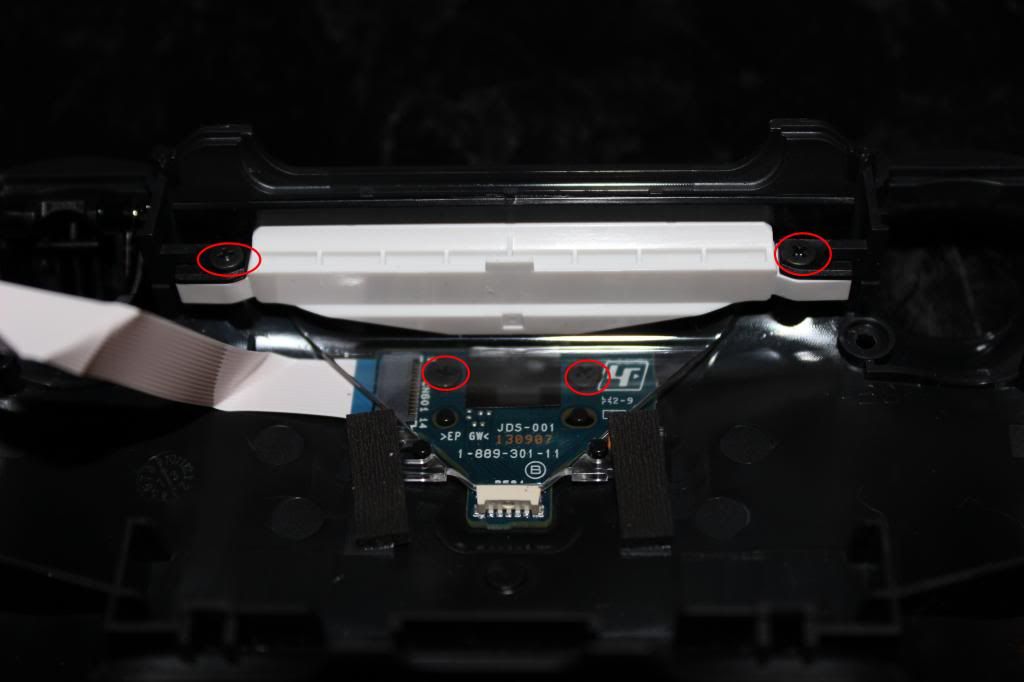
IMG_0342_zps8f1dea6e.jpg

Remove and set aside the micro usb jack.
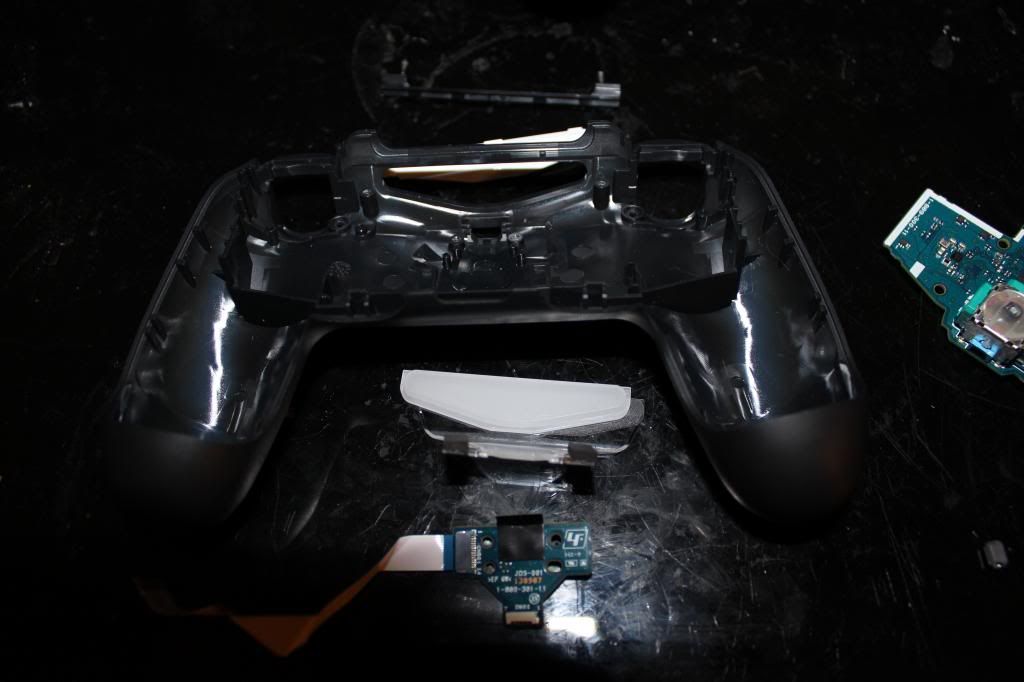
IMG_0343_zpsf0d6dec8.jpg

This is where you'll be wiring up the joystick and buttons to. Looks fun doesn't it?
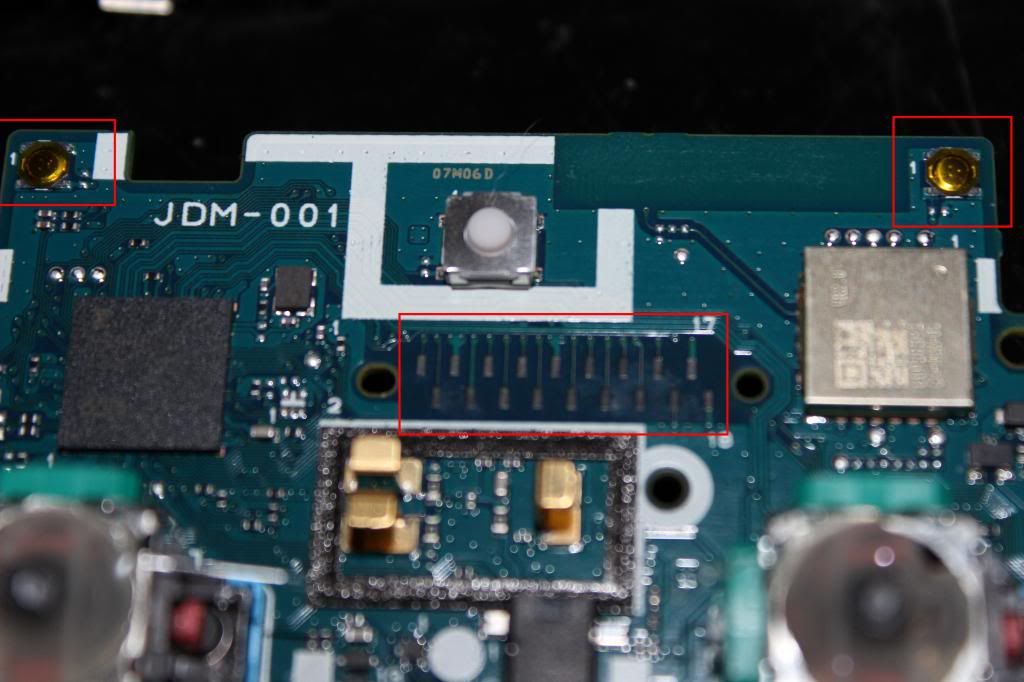
IMG_0345_zps3e268abe.jpg

To gain access to the copper contact pads the carbon residue has to be scraped off.
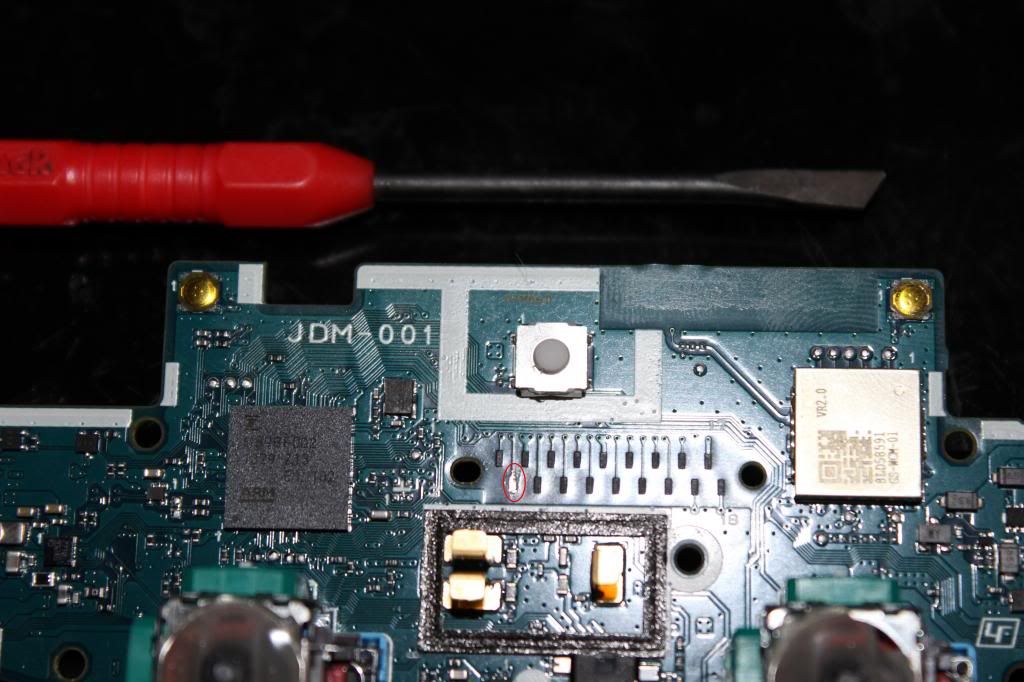
IMG_0346_zpse7c0faea.jpg

I have a pick set that I got from radio shack that I use to scrape off the carbon pads. The one on the left I accidentally broke in half from trying to pry something off. I suggest not using these picks to pry stuff off.
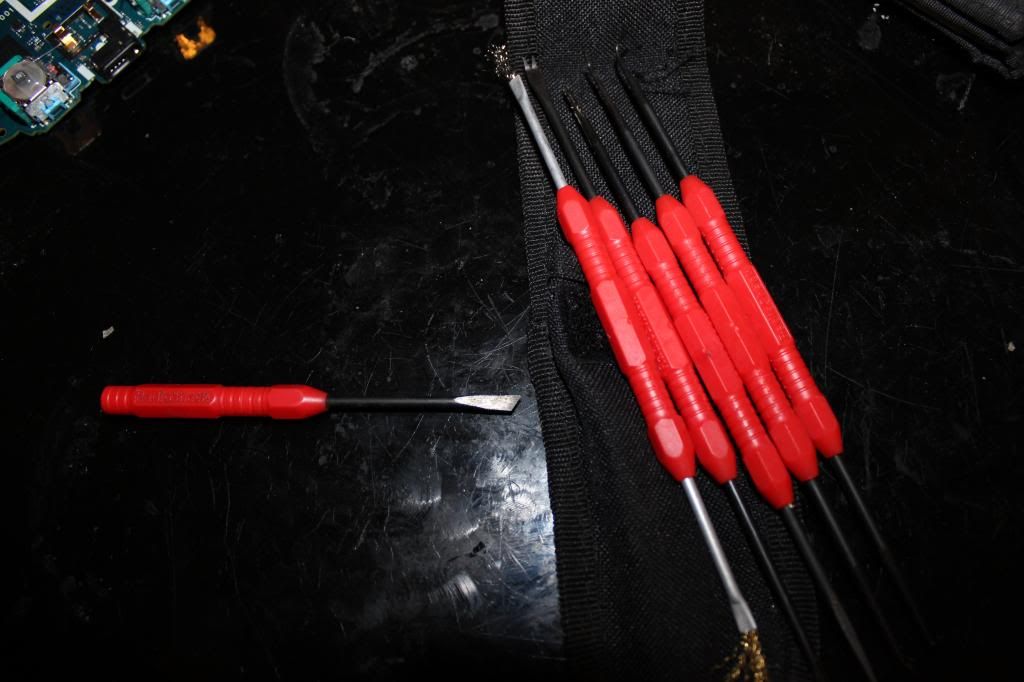
IMG_0348_zpsb592d658.jpg

Here's the pinout for the 18 contact pads and which need to be scraped. It is the same for all the model revisions 001, 011, and 020.
1-(Don't worry about me)
2-L1 (needs inverting)
3-10k ohm to pad4
4-L2
5-right
6-up
7-left
8-down
9-ground (Don't worry about scraping me either)
10-home
11-x
12-circle
13-triangle
14-square
15-(Don't worry about me too)
16-R1 (needs inverting)
17-10k ohm to pad18
18-R2
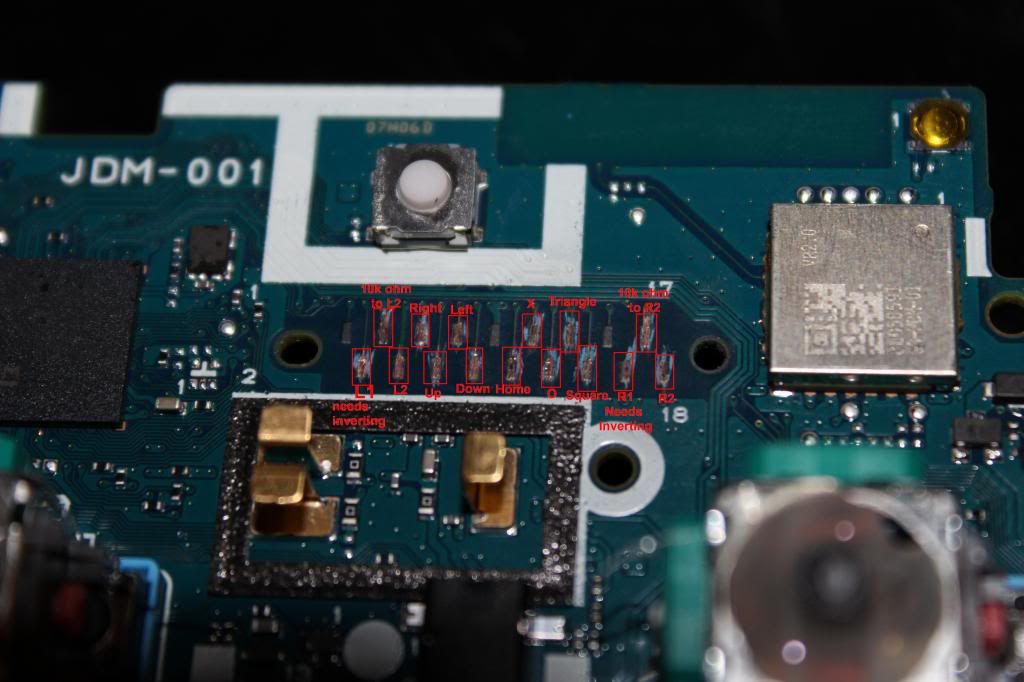
IMG_0349_zps2f5337b0.jpg

Tin the contact pads. Use flux as necessary.
IMG_0350_zps46ac45f6.jpg

Tin the two very small contact spots in the rectangle for Select.
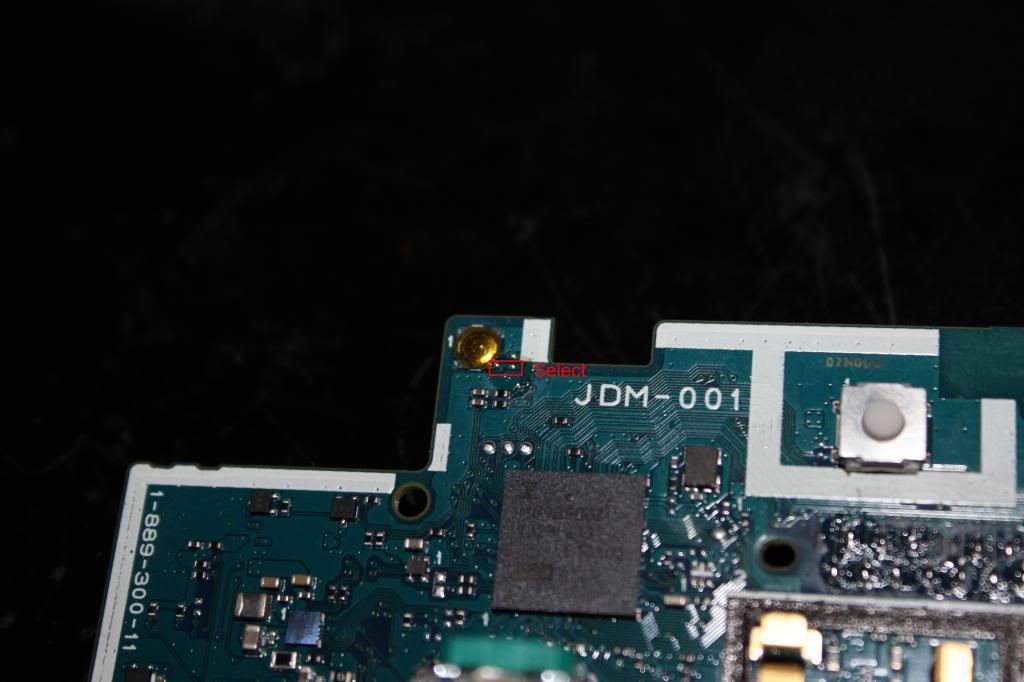
IMG_0351_zps5e8432e9.jpg

Tin the two very small contact spots in the rectangle for Start.
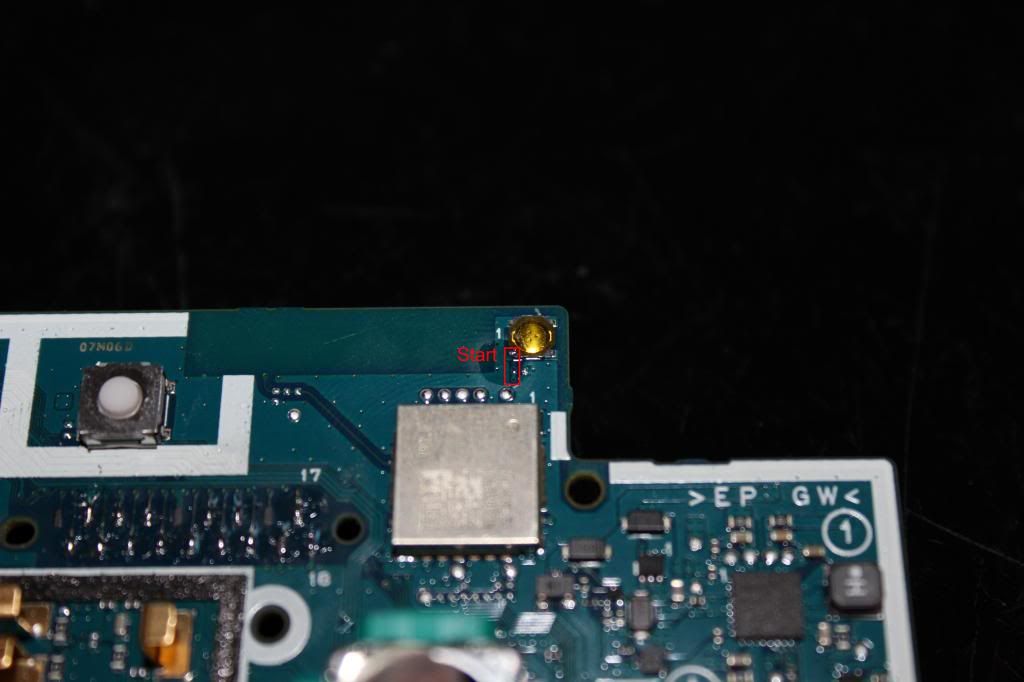
IMG_0352_zps4cd67d9f.jpg

Look at this. This is the ribbon connector for the usb jack. See how simple this is? Want to see how hard your life will be if you don't use this? Just check out the next picture.
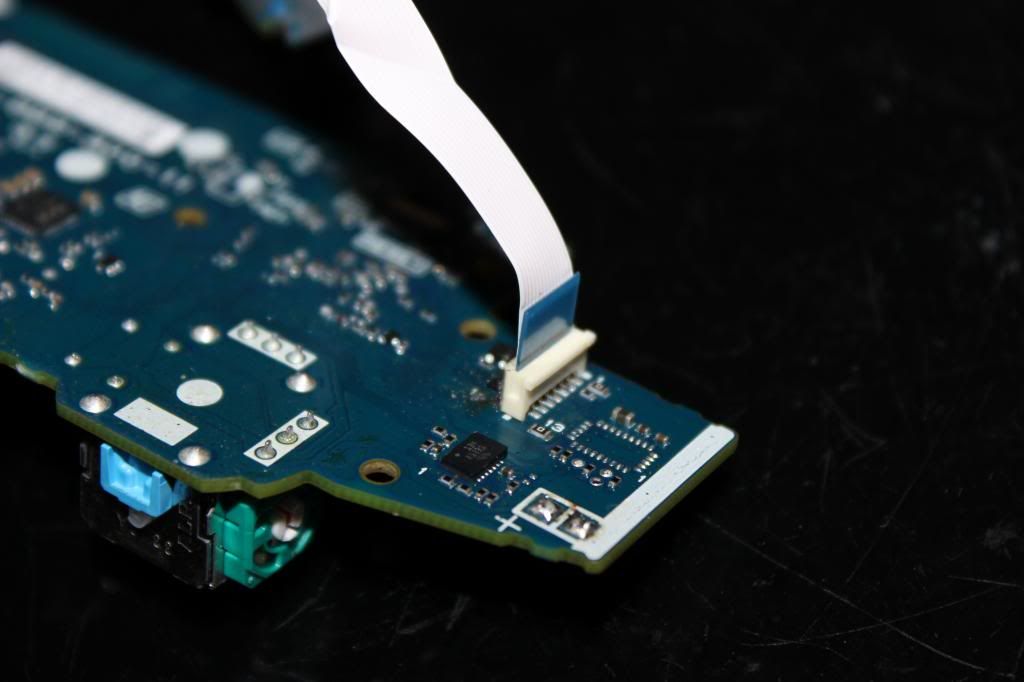
IMG_0354_zps133a474f.jpg

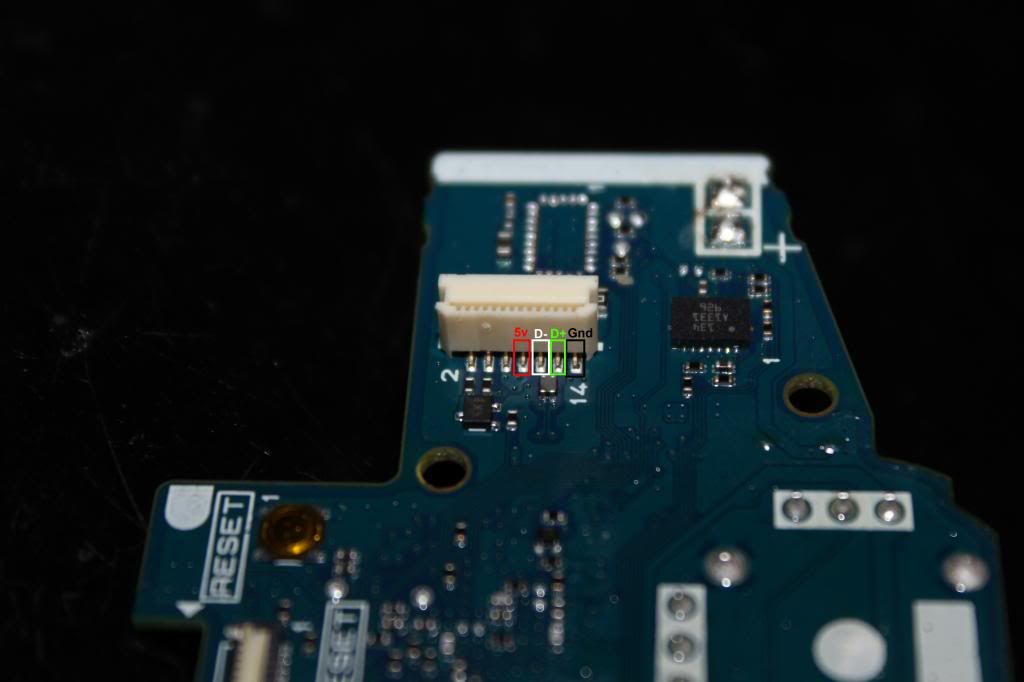
These are the four pins you will have to solder to if you don't want to use the micro usb jack. Pretty small and cramped there.
Note this pin out is for the JDM-001 model and the pictures will reference to that model.
8- Vcc
10- D-
12- D+
14- GND

Pin out for the 011 and 020:
7- Vcc
8- Vcc
9- Gnd
10- D-
11- D+
12- Gnd
IMG_0353_zpsdb05b9bc.jpg

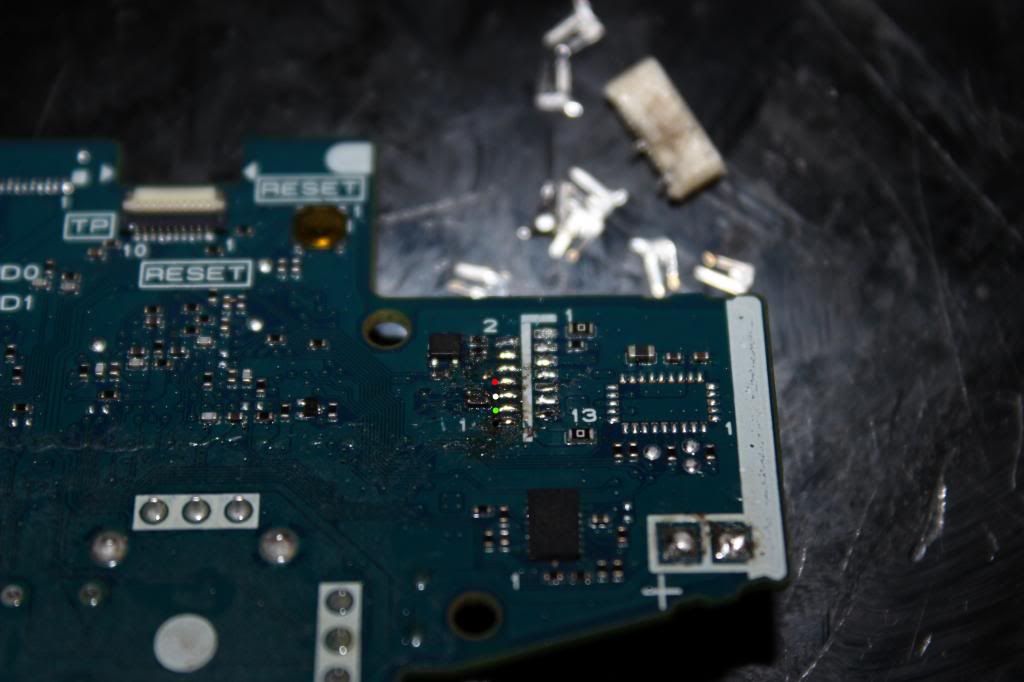
Of coarse removing the ribbon connector will make soldering to the contact pads much easier. This route might be necessary if you are limited in case space. In which case you'd have to remove the battery jack too.
IMG_0355_zps79565b7c.jpg


Now the DS4 pcb is all prepared to begin the wiring!

Madcatz SFV TE2+ with optical joystick???

$
0
0
Hello all. I just got the TE2+ for SFV and I have a happ p360 joystick I bought a while ago. Is it possible to put it into the madcatz stick?

And if not, what's the easiest way for me to get a stick I can use for SFV on PS4 with a perfect 360 joystick? Price not an issue. I'm an old school player and I need the p360 with the bat top. Please help your boy. Thanks!

how am i going to remove the wires off this ?

$
0
0
notice no tabs or anything to push its literally just flat? 64hyxw.jpg
i have 2 other atroxs next to mine and me and my boys are puzzled were about to just throw it away.

Saturn Eclipse sticks

$
0
0
I noticed that my local game store has 4 Saturn eclipse arcade sticks for $20\ea. Are these decent for games like bomberman or otherwise worth the price to have another few controllers? They're still new in the box.

Sega HSS-0136 Mod Work Log

$
0
0
Hello and Welcome to my HSS-0136 Work Log.

The Sega HSS-0136 is a 1 player equivalent of the larger and more famous Sega HSS-130
which is a fully functional replica of a Astro City Control panel made for the Sega Saturn and later the Dreamcast.

The Sega Virtua Stick HSS-0136 is not to be confused by it failed US counterpart
The Sega Saturn Virtua Stick MK 800112
44509417-260x260-0-0_Virtua+Stick+for+Sega+Saturn.jpg
The MK 800112

Keep in mind this project is far from complete at the time of writing but I hope to provide insight and assistance to others hoping to do the same mod.

First I got a Dreamcast Variant of the HSS-0136 Virtua Stick. Re-branded as the "DC GAMEMATE"

HSS-0136before.png
Before tear down

The Words DC Game mate and Fighting Stick are just foil labeled applied to a preexisting Sega Saturn HSS-0136. Yes at the factory the Sega Saturn HSS-0136 was converted quickly to Dreamcast with a few foil labeled applied on the top panel and this
SStoDCConverter001-1.jpg
A Sega made Sega Saturn to Dreamcast converter.

Too bad this one was broke before I received it too. Some of the wires from the dreamcast cord came loose. I tried to re-solder them back to the board. but unfortunately they were in the wrong order. As when I used it I burned out the controller ports on my Dreamcast.

Ok, lets go Repair the Dreamcast controller board.
Using this guide
http://www.instructables.com/id/How-to-repair-a-dreamcast-with-dead-controller-por/
I replaced the burned out Resistor-Fuse with two 10 ohm metal oxide resistors I got from Radioshack. A less than $2 repair.

DSCF1479.jpg
DSCF1480.jpg
DSCF1478.jpg
There is the location of the bad resistor-fuse, I neglected to take a picture of the completed repair
but you should see how its done in that Instructible link I gave above.

The red and black wires on the controller board are from a unrelated mod where I replace the cmos battery with a standard 3 volt coin battery.

Okay back to the HSS-0136 Virtua stick.

I manage to peel off the top panel art with out destorying it, by soaking the whole top panel in HOT water then carefully and slowly pealing off the art. Remove the panel from the rest of the arcade stick first before water submersion.

HSS-0136Panelart001-1.jpg
A scan I did of the panel art

Inside I found an Ascii Joystick and knock of buttons, both are Bantha fodder.
Earlier HSS -0136 sticks had Seimtsu parts, later on (especially the DC variant) Sega to save money switched to Ascii made parts. HSS-0136 with Ascii parts have 29 mm button holes, so just like the Sega Agetec stick for the dreamcast the button holes needed to be widen or a replacement panel needs to be made. I also suspect the holes for the joystick mount is off from Sanwa/Seimtsu standards so I have to drill new mount holes later on as well. LS-40, LS-55 and LS-56 fits in where the stock Ascii stick was.

2011-09-29224610.jpg
The button daughter board. Note the cut Ribbon cable.

You have to unsolder each button, or snap the buttons off, as in a mod you not using this daughter board again. I saved it to test the traces to find out the wiring order.

I will add more as my Project progresses.

Bag to carry two sticks?!

$
0
0
can you guys recommenced a bag which has enough space for two te fightsticks? one of em modified as a hitbox.

Question about concave buttons on a Mad Catz TE2 +

$
0
0
Hello everyone!

I was curious if anyone can tell me ----> is it possible to have concave buttons on a TE2+ such as Happ, IL etc?

Thank you in advance to anyone who can assist me!

Are fight boards (aka Hit Boxes) cheating? (Experiments and Guide)

$
0
0
Apparently, during the Wednesday Night Fights stream, Hit Box developer and enthusiast Husser_Brian came under fire because he, shock horror, won matches using a fight board controller. Stream monsters, looking for something to troll and be salty about, immediately called out accusations of "cheat box."

While I don't enjoy giving validity to stream monster trolls, for some people these accusations are rooted in legitimate concerns. I want to address these concerns as soon as possible for the upcoming tournament season. Especially as a fight board user myself.

Tonight, I will dedicate myself to fighting game science, and come up with an answer I hope that tournament organizers, players, and spectators, will be happy with.

Here is my scientific method thus far, if anyone has any complaints, please feel free to voice them.


Please note my use of the term "fight board." This term will be used to describe custom built or modified controllers made to emulate the ergonomics of playing a video game using only a keyboard. The Hit Box is a specific product built by the Husser brothers using a specific layout also developed by the Husser brothers. However, the accusations and concerns facing the Hit Box are not at all unique to the Hit Box layout and product, they are issues that all fight board controllers face. My personal controller is not a Hit Box, or uses the true Hit Box layout, but is a modification of the Mad Catz Fight Stick: Tournament Edition, using a derivative of the Hit Box layout.

I will:
  • Attempt to devise a method by which a conclusion can be reached regarding universal pros/cons of fight boards over arcade-style sticks and traditional home console gamepads. ***This will be the toughest part of the entire process, as the vast majority of these will be entirely subjective, and not based in anything that can be proven by real science.***
  • Devise a method by which to test the way a game, console, and controller PCB reacts to having opposing cardinal directions pressed silumtaneously--easily the biggest advantage of a fight board controller--on a case-by-case basis.
  • Test these methods with current materials (games, consoles, and controllers) available, and record results.
  • Based on results, derive criteria for whether tournaments should issue bans to fight board controllers based on games and consoles tested. ***As of right now, I will be using David Sirlin's criteria threshold of "Enforceable, Discrete, and Warranted" as defined in his book "Playing to Win".***
  • Compare results of experiments to banning criteria, if results meet ban criteria, record. Submit results to EVO organizers, and/or otherwise find ways to distribute results to other tournament organizers.
  • Publish testing method such that games, consoles, and controllers that are unavailable for testing at the moment (I do not own them, or they have not yet been released) may be tested optimally.
  • Devise "optimal solution" for game software interpretation of simultaneous opposing cardinal directions such that game developers might be able to better prepare their game for fight board controllers and, as such, fight board controllers would not have to be banned from competitive play featuring their game.

For anyone who believes I am throwing the term "science" around lightly, please be aware I am a published chemist and currently studying to be an electrical engineer. As such I am more willing to defend the integrity of science and experimentation itself rather than my preference to use fight board style controllers. I would prefer for fight board style controllers to be able to fall well under good ban criteria and never have to face a ban in a tournament setting. However, science is used to become correct, not to prove that you are already correct.

Also be aware that in any case situation I find that fight board controllers meet sufficient criteria to warrant a ban, I, personally will push for tournaments to ban fight board controllers, and, if they are not banned, will not use them. I don't like using stick anymore, but hell, if it's ban-worthy, even if it's not actually banned, I'd feel bad using it.

I want this shit settled, there's a tournament on Saturday I want to go to, and I don't want whatever wins I receive to be tainted by label that I was cheating, by real criteria, not by motherfuckers being salty.

The worst sticks you've ever seen

$
0
0
I felt compelled to make this thread today as I encountered this abomination on a local auction site:

whatthehell.jpg

Has anyone seen anything worse than this? If so please feel free to post it.

Universal PCB (eventually) thread

$
0
0
UPCBakishop.jpg

Version 2.5 released! Currently tested and supported systems:
-Xbox
-Gamecube
-PC USB
-PSX
-PS2
-PS3
-NeoGeo
-NES
-SNES
-Sega Saturn
-Sega Genesis (3 and 6 button)


Coded and believed to work, but not tested:

-Sega MasterSystem
-TurboGrafx-16 (2 and 6 button)
-Atari Jaguar
-3DO
-FM-Towns
-X68000 (2 button)
-Amiga CD32
-Most old DB-9 controller systems from the 80's like Commodore 64's.

Other features:
- On-the-Fly button remapping using a Programming button: Hold the button you want to remap, press the programming button, hold down the buttons you want the original button to be (or none if you want the button disabled), release the programming button.
- Ability to make your mappings permanent: Hold down the programming button, press start three times. Mappings are different for each system, so your NeoGeo mapping can be totally different from your PSX mapping.
- 'Tournament Mode' to disable or enable the Start button via keypress: Hold Select and Start, press Up to enable Tournament Mode. To disable Tournament Mode, hold Select and Start and press Down. Tournament mode settings are NOT saved, so Tournament Mode is always disabled when you first plug the stick in.
- 'Turbo', adjustable button rapid fire: Press Program by itself, and hold it. Press and hold the button you want to change the speed of. Press Up to make the speed faster, and Down to make the speed slower. 'No turbo' is the same as 'fastest turbo', so to turn it on initially, you'll need to go Down.

Imagine you buy a new Sega Saturn, and you've never had one before. You do already have a fighting stick with the UPCB in it that you play all the time on other systems. In order to use your stick on the new Saturn, you would need 1. A Saturn plug, either from an extension cable or a sacrificed or dead controller. 2. A DB-15 plug and hood. Total cost to play the stick on the new system, somewhere between $1 and $5. That's the goal of project, to support as many systems extremely cheaply.

Months down the road, a new game system, the XCube3, comes out and you want to play your stick on it. The XCube3 wasn't even out when your UPCB was made, so you think you're stuck. But, as soon as the controller protocol is supported in UPCB, here's what you have to do: 1. Plug the stick into your PC with the same cable you use to play PC games and mame. 2. Run a program that updates the UPCB 3. Make a cable just like above. UPCB can be updated anytime without even needing to open the stick, and with the same cable you've already got.


Here is the updated schematic. Sorry for the huge size of the image.
http://www.marcuspost.com/downloads/upcb/UPCB_Schematic_21.jpg
Here are the 'Gerber' files for the Rev 2.1 board. Any PCB fabrication service can use these to stamp out as many as you could possibly want.
http://marcuspost.com/downloads/upcb/Rev2.1.zip

The core is the 18LF4550 I/P 'PIC' microcontroller. The crystal is 20 MHz, and the unmarked resistors are just pull-ups, so any high resistance resistor will work (go with 4.7k ohms). C1 and C2 are just small ceramic caps; I've been using 0.1uf. Put them as close as possible to the two pairs of power pins on the PIC. The location and value of the C3 electrolytic cap is not too important; I've been using 33uF caps.

Here is the sourcecode using MPLAB and Microchip's C18 compiler : http://marcuspost.com/downloads/upcb/UPCB_25.zip
Procompiled .HEX files are in there under the '_output' directory.
I'm using a new naming structure for the .HEX files. Check the 'Which one do I use' file to make sure you use the one that matches your setup.

Instructables:
How to Assemble a UPCB: http://www.instructables.com/id/ETNJA2CF23Z33K8/
How to Create a Console Cable: http://www.instructables.com/id/E9SM77YF1Y7H1KH/
How to Create a USB Button Select Cable:http://www.instructables.com/id/EO5ISEYF2FRV8XH/
How to Upgrade the UPCB Firmware: http://www.instructables.com/id/E9A4ERZF2FRV8RG/
How to Install a UPCB in a HRAP2: http://www.instructables.com/id/EDZKJN6F2NOBR7S/
How to Piggyback a Dreamcast Controller:http://www.instructables.com/id/ELYFIVKF54HJ3K4/
How to Piggyback an Xbox360 controller:http://www.instructables.com/id/How-to-Piggyback-an-Xbox360-controller-on-a-Univer/

Q: So how does the UPCB know which system it's connected to?
A: Pins on the 15 pin connector that aren't used are tied either high or low. Based on which pins are tied where, the UPCB detects which system it is and acts accordingly. The pinouts must match what the UPCB expects exactly. The see the currently assigned values, check the systemselect.txt file in the ZIP.

Q: How would I make one of these?
A: Any way you like. You can make one one a breadboard, on some type of prototyping board like the one I've been testing with, etch your own PCB, have a PCB fab house make a PCB for you, whatever. Fabbed PCB's are available for sell: http://forums.shoryuken.com/showthread.php?p=3991373#post3991373 The files required to have your own manufactured are available here: http://www.marcuspost.com/downloads/upcb/Rev2.1.zip
I highly recommend having a professional fab house make them; doing that many vias by hand etching your own from those files would suck.

Q: How do I program the PIC in it?
A: Once the bootloader has been programmed on it, you use the USB cable to update the PIC.
In order to get the bootloader on it, that would require a PIC programmer of some sorts. Since it's only needed once, you just have to find someone to program it that first time. I'll happily program a PIC for anyone who sends them to me, as long as they send me postage for mailing it back.
Or you can get a PIC programmers and start learning microcontrollers. They're kinda fun.

Q: What's the deal with PS2 support?
A: The UPCB currently works marvelously for every Playstation 2 game I test it with. Previous problems have been eliminated. As of yet, I have not found any converters it works with, and since I've tested something like 4 different converters (old PSX->USB Radio Shack model, Pelican PS2->PS3, Innovation PS2->DC, and Magic Box PS2->Xbox) and none of them worked, I do not have high hopes for any other converters to work. [Side note: Magic Box and Innocation converters work just peachy with the UPCB's Saturn support.] This will be addressed in the future.

Q: You have USB. What about PS3 support?
A: PS3 support is in and working, including PSX button support. Tested successfully on 20GB, 40GB, and 60GB models, including backwards compatibility and PSX button.

Q: How is this different from a project box setup?
A: Good question. First of all, you can use project boxes with the UPCB. Just ground pin 9 so the UPCB thinks its connected to a Neo-Geo, and make sure the project box pinout matches. So, all of the advantage of a project box setup are there. Here's a short list of what makes the UPCB better.
1. If you do use project boxes, then any project box interface you make will have the benefit of programabilty (once I code programming into it)
2. Project box setups require a sacrifice controller, a project box, and a jack. For systems supported by the UPCB, you only require a cable (third party extension cables are tons cheaper than new controllers), a jack, and a hood (which are tons cheaper than project boxes).
3. Most project boxes can't really be securely attached. (GoPodular's IDC cable and velcro method is one exception) Using a D-Sub hood with thumbscrews means you can attach the cable very securely. If you tripped over an attached serial cable, you're PC would go flying. Project boxes have pressure and weight that can cause them to loosen.
4. Soldering wires into the D-Sub jacks is much cleaner and easier that some pad hacking.
5. If you do use project boxes and are using the optional Programming button, then any project box interface you make will also have the benefit of on-the-fly button remapping. These mappings can be permanently saved like every other system.
6. Tournament Mode is still usable with project box interfaces.

Q: What would this cost for me to make?
A: The most expensive item is easily the PIC. However, you can sample 3 of them for free from Microchip.com. The rest of the parts are pretty cheap. A Digikey shopping list is already in this thread; also kits with everything but the PIC are available to purchase: http://forums.shoryuken.com/showthread.php?p=3991373#post3991373

Q: What about Xbox360 support?
A: Unless someone cracks the protection Microsoft uses to make sure you use their controllers, it ain't gonna happen. You can still use a Xbox360 project box, or piggyback a Xbox360 PCB. More on the piggybacking in a bit.

Q: What about Dreamcast support?
A: Dreamcast is gonna be hard, but I havent given up hope on it. For a good while, Dreamcast won't be supported, but I hope to figure out how to do it eventually. You can still use a Dreamcast project box, piggyback a Dreamcast PCB, or use the working Saturn support with a Saturn->Dreamcast converter like the Innovation.

Q: So what's this about piggybacking?
A: Both of the main problem systems (DC and X360) use two wires for communication. So, it is possible to use an analog switch IC to ignore the wires from those controllers until we want them. What this means is that you can install the UPCB along side a DC or X360 PCB, connect them together all clean inside your stick, and have a Dreamcast or Xbox360 cable connecting to the jack on the back like normal. Unless they open the stick, it'll look just like the DC or Xbox360 was naturally supported.
Piggybacked systems can NOT take advantage of button remapping, however they CAN take advantage of Tournament Mode.

Q: What about the Xbox?
A: Xbox is now tested and working. There is not, nor will there likely ever be, support for Xbox memory cards or headsets.

Q: Gamecube? N64?
A: Gamecube support is in and works awesome. N64 should be dead easy to implement, but I don't have one to test with. As soon as I do, it'll be in.

Q: What's this about Smash Brothers working with a stick?
A: There are two Gamecube modes specifically for Smash Brothers: one simple mode that tries to capture the ease of the Wiimote-Only control scheme from Brawl, and another advanced mode that tries to make everything possible. Please read for more information, and feel free to suggest improvements. http://forums.shoryuken.com/showpost.php?p=5171213&postcount=477

Q: How big is the PCB itself?
A: 82.2mm x 67.3mm. Assembled, its about 14mm tall depending on the components. One of the connectors hangs over the edge a little, making the assembled length about 85mm.

Q: What is the option Programming button do?
A: Support for recording and playback is expected, but is not implemented yet. The current features of having a programming button are:
1. Using a USB Button Select cable, you can press this instead of Start & Select to go into bootloader mode for reprogramming the PIC.
2. On-the-fly button remapping. Press the button you want to remap, hold down the programming button, hold down the buttons you want the original buttons to press, or none at all if that's your taste, and release the programming button. You can make your mappings permanent for that system by holding the programming button and pressing Start 3 times.
3. Turbo mode. Press and hold Program, then press and hold the button you want to adjust the rapid fire speed of, and move the stick up or down to adjust the speed. 'Fastest' is the same as no turbo at all.

Q: I hear about this 'button select' stuff, like the 'button select USB cable'. What other options are there when plugging the UPCB in?
A:
Heh, I keep weird hours. Night owl by nature, and with classes out, I went straight to my 'up till 4 am' schedule.

The three kicks combination works with ANY cable, not just PC. Added in version 2.3, to every version including the ones that don't support button remapping. It resets all of the button mappings to default. I had a guy with his buttons mapped weird and no program button, so he couldn't change them back, and the newer code versions don't overwrite the EEPROM the mappings are set in.

As far as I can think of, that's the only button combination that does something on every cable and every code version.

The others that I can think of from memory:

Button Select USB cable:
Start+Select: Bootloader mode
Program: Bootloader mode
Start: Stick directions are reported to XY axis (PS3 left analog) instead of both XY axis and POV simultaneously
Select: Stick directions are report to POV hat (PS3 D-pad) instead of both XY axis and POV simultaneously (I may have these backwards)
Jab+Short: Xbox1 mode (just added in 2.5)
Fierce+Roundhouse: Use Xbox360 piggyback

Gamecube cable:
Start: Stick is reported to D-pad only instead of both D-pad and left analog
Select: Stick is reported to left analog only instead of both D-pad and left analog
Strong+Forward: Smash Brother Basic mode
Fierce+Roundhouse: Smash Brothers Advance mode

Genesis cable:
Select: Three button mode instead of default six button mode (just like the 'Mode' button on the original controller)

Q: I'm having a problem updating the firmware with Vista. I'm receiving an 'error 997'
A:
fluxcore wrote:
Just a quick note to anyone trying to run the PDFSUSB program under Vista and getting 'error 997', try the following:

Right click pdfsusb, properties, compatibility, set to XP or 2000 or so. Also check 'run as administrator' if you haven't disabled UAC.
In device manager, select the PIC18F4550 Family Device, right click properties, power management, uncheck 'allow the computer to turn off this device'
Run the program as admin (right click, run as admin [if this is available])

Should solve the problem. As seen at http://forum.microchip.com/tm.aspx?m=241830

For those who need help assembling the rev 2 board, here is the board with the resistors and capacitors labelled, and the pinout for each direction/button. Buttons are labeled in their usual Street Fighter name: JAB, STRong, FIErce, SHOrt, FORward, ROUndhouse, SELect, STArt. EX0 is the optional fourth punch button, EX1 is the optional fourth kick button.
labelledupcb21qx9.jpg

Obs mx silenced

$
0
0
Hey guys,

Long time no tech talk.....lulz... with the return of sfv and my wife not liking loud sticks I went for the silenced route again. I really wanted to try the obs mx from Bryan and pas but I noticed they didn't have foam like hbfs because of how they work. I love cherry reds and the rubber o rings on all my mech keyboards and I have used various cherries on the version 1 hbfs. They work good but just like all the silenced buttons that use foam they lose some of the hardness. I finally got some obs mx and threw some rubber o rings on them. They work great. They don't interfere with the adjusted sensitivity of the obs mx buttons but they do cut down on the bottoming out travel after the switch engages which is nice. I suggest the 50a .4mm hardness rings. They don't feel as squishy ad other silenced buttons and they are super quick and durable. You can buy them cheap on eBay. If this has already been posted sorry hehe

Ps I let Bryan know too.


987C1347-729E-4D83-B796-8047F8934852_zpsvxjc1txh.jpg

Art's Hobbies Big Update! 1/32" Acrylic, V.S., Pro, Qanba, HRAP V3/VX, Custom Art Dustwashers.

$
0
0
Website: Welcome to Art's Hobbies

Big Update 3/4/2012

Hey guys! It's been a while since I've had the chance to be more active around here, and provide the occasional updates and question sessions. Long story short, I picked up consulting on a software project for the County. So between working on that and taking care of orders, I've been pretty beat up, trying to balance everything. Even with some added help in the business, I'm still the only one to answer emails and work on the more customized orders, so I have been a bit overwhelmed, particularly over the winter season and tournament seasons.

Now that my county project is at a phase where I can take a break, and after I had a little opportunity to relax, I'm refreshed and back with updates! And what timing too... with the V.S., Pro, and other new things coming out! Here's some things on the plate.

1/32" Acrylic!
This is one of the biggest things for me. For a while, I've had people ask me about 1/32" options, and I always had to turn them down because the only material that is normally available in that thickness, is Polycarbonate (Lexan). I've mentioned before that laser cutting Lexan can emit potentially toxic fumes and tends to discolor and burn the edges. So for a while I've been searching for an acrylic option in 1/32" thickness. Some places could make normal acrylic in that thickness, but it becomes way too brittle. Regardless, I continued to look for options.

Now, finally I have found a source that carries 1/32" Impact Modified Acrylic. This material is 10x stronger than normal acrylic, and is perfect for a thin alternative to Polycarbonate. It's incredibly flexible and more than durable enough for fight stick purposes, even for those times of pushing down hard to snap in buttons. Also, Acrylic has the advantage over Polycarbonate in that it is crystal clear (more clarity), less prone to scratches and will not yellow over time when exposed to UV (sunlight). Here are some images for you to compare.

acry_1.jpg

Incredibly flexible and durable. (It can bend more than this)
acry_3.jpg

Superior clarity. And this is after it was bent.
acry_2.jpg

So I'm very excited to offer this new line of acrylics. This idea of 1/32" Impact Modified Acrylic is still so new, that most plastic businesses either haven't even heard of it, or still don't carry it in that thickness. Trust me, I've called like over 30 companies in California alone, and only one out of those 30 knew what I was talking about.

I'm aiming to make these available on my site in a few weeks. I just ordered a huge batch of them so I still need to wait for them to arrive, while also updating a lot of other products and the need to code in a lot of new options on my site.

Madcatz Street Fighter x Tekken V.S. Fightstick

As it's already mentioned in the V.S. thread, covers for the Top, Bottom, Sides and Corners have been worked on. The templates are currently available. That case is incredibly modifiable and easy to personalize. There's more that can be done and I'll continue looking at ways to offer more options to spice things up. More info and pictures in that thread:

V.S. Thread - Post 1
V.S. Thread - Post 2

Madcatz Street Fighter x Tekken Pro Fightstick

I've also got the Pro Top and Bottom covers. More info and pictures in the Pro thread here:

SFxT Pro Post

Qanba Plexi and Artwork

I've had a lot of requests for this but while working on my other projects, I really couldn't give an answer to working on a new stick. Now, I finally had a chance to complete the Qanba plexi. It also has Laser 3D engraved countersunk holes so you can use the existing screws. This method of countersinking can only be done on 1/8" or thicker material, otherwise it can cause thinner plexi to become too brittle and crack. So thank goodness Qanba plexi's are 1/8" thick.

I understand Qanba has their own plexis, but I was told it can some times be too large for some of the fightsticks and some sanded was necessary. Well, I modeled my template from the original Qanba plexi, and the person whom I've worked with (Motoyuki) has confirmed that everything fits perfectly without sanding (as he had to do with his replacement Qanba plexi from another source). Additionally, this will allow me to offer Artwork print and Cut services and other plexi color options for the many different colors Qanba has.

qanba.jpg


HRAP V3/VX and Artwork.

Finally, I get a chance to work on the V3/VX. It's been on my plate for a while, and I finally got to it. One of the things that stalled this project were the issues with the countersunk screw holes that could put a lot of stress on regular acrylic. But with the 1/32" Impact Modified acrylic, it is no longer an issue!

Notice, like the MadCatz Pro, I did not cut the middle screw hole as the screw there would very likely cause discomfort with game play, since it's so close to the lower button.

The necessary screws to install the plexi/artwork, as well as giving you top access for modifications, will also be included. Will be coming in another week or two along with all the other new additions =).

Here is the VX/V3 Template.

( Taokaka design by Stoogie )

vx.jpg


TE Soul Calibur V Covers. (In Madcatz TE Section, scroll down a little to see them)

te_scv_1.jpg

te_scv_2.jpg

HORI Soul Calibur V


hscv_2.jpg


Custom Artwork Dustwashers Return!

cdw_1.jpg

When I first introduced these, they were laminated by a clear acrylic laminate spray. Unfortunately, that spray produced some technical difficulties in its application and made it difficult to produce a consistent, good quality product. So for a while, I was trying to look for an alternative. It took some time because most laminates that were presented to me, usually had some type of vinyl, polycarbonate, or pvc element to it, all of which are bad for laser cutting.

Well, finally I found a great quality overlaminate that is safe for laser cutting. So now, I can bring back the custom artwork dustwashers that many have emailed me about, and with more consistent quality.

Here are some closeups of some SFxT Dustwasher samples.

cdw_6.jpg

cdw_5.jpg

cdw_2.jpgcdw_4.jpg

Custom Artwork dustwashers will be available again this upcoming week.

Alright, that was a ton of stuff. Time to get some rest. Hopefully I get to talk to some of you guys again, and get a chance to check out everyone's stick posts. Been seeing great things! Thanks again for everyone's support! Have a good one!

-Arthur

Also, Shoutout to JDM. Thanks for all your help to answer questions while I wasn't around on my threads. You rock!

Please check my website for more details : Welcome to Art's Hobbies

Hori Real Arcade Pro Thread for all versions (IN PROGRESS, COULD USE YOUR HELP AND INPUT) v2

$
0
0
This post is in progress and will forever need updating.


NOT ALL INFO IS 100% CORRECT! SO IF YOU ARE USING THE DESCRIPTIONS TO MAKE PURCHASES, PLEASE DO ADDITIONAL RESEARCH. A LOT OF THE INFORMATION BELOW IS COPY/PASTE.


IF YOU ARE ABLE TO HELP PROVIDE INFORMATION, PHOTOS, DETAILS, OR PERHAPS EVEN HELP DO RESEARCH USING THE LINKS AT THE BOTTOM OF THIS FIRST POST IN SPOILER TAGS AND REPORT BACK, IT IS MUCH APPRECIATED.


It's taken me a lot of time to gather this information up so far, put it in a neat format, find photos and resize etc. If you can volunteer to help for the good of all arcade stick lovers and SRK TT, please do.


First off, I've gotta shout out @Superking for the original post back in July 2005 and for the work he did in keeping track of info and data on the Hori RAP sticks at least up until the middle of the PS2 gen and some of the PS3/360 gen.
Below you'll see the info he organized reworked in a new format with more info and photos.

Original thread (39 pages of topic from July 2005 to mostly April 2012)
http://forums.shoryuken.com/discussion/13083/hori-real-arcade-pro-faq-for-all-versions/p1

Shoutouts to those who've helped provide information on this updated list that deserve credit for their contributions:

@hibachifinal @VirtualCosmic @Darksakul @NENDO @Digital- @quashpdarkman @N10248 @anzhar @Batsu @General_Awesomo


If you have general arcade stick questions, please ask in the "Absolute Question and Answer Thread v.3 (ASK YOUR QUESTIONS HERE!)" thread
http://forums.shoryuken.com/discussion/194283/absolute-question-and-answer-thread-v-3-ask-your-questions-here

If you desire information on other arcade sticks that are not listed here or want suggestions on what to buy, please visit the "What Stick/Controller Should I Buy? Read the Guide on Pg 1 Before Posting." thread
http://forums.shoryuken.com/discussion/137321/what-stick-controller-should-i-buy-read-the-guide-on-pg-1-before-posting/p1

There will be no tier list, and there will likely not be a "I SUGGEST YOU BUY ________ ARCADE STICK" info.

This is information for you to use to your advantage to make an independent decision based on what features you may or may not enjoy.
PLEASE PLEASE PLEASE do not come in to this thread and just ask "Which one should I buy?".
Use knowledge below to grow, think, and learn.


Listed in order of console:


Playstation 1 / Playstation 2


Spoiler


Hori-RAP1-Mirror-01.jpg

Hori RAP1
=Hori Real Arcade Pro (Mirror Finish)

SRKTT thread-
=Unknown

Case-
RAP Base
=Weight (2.6 kg or 5.7 lbs)
=Sizes - Width = 412mm, Depth = 243mm, Height (including lever) = 135mm
=One main plastic base. Does not have individual plastic pieces
+Same design/production base by major company for multiple consoles made swapping parts and getting 3rd party support easier
=Interior of case has plenty of space for mounting PCBs
=Must open from bottom (Which voids the warranty)

Metal Panels-
+Both top and bottom metal panels

Plexi/Art-
=No default plexi
=Mirror finish looks nice but is easily susceptible to scratches and fingerprints
=Plexi options available via Tek Innovations
=Nuts and bolts for top metal panel are difficult to remove and assemble
=Top loaders available via Tek Innovations allowing removal and assembly of top metal panel easier

Bottom Padding/Feet-
=No padding
=Four rubber feet

Joystick-
+Sanwa JLF-TP-8Y-SK
=Mounting a Seimitsu LS-32 is possible with modification, previous documentation lost to GeoCities

Buttons-
-Hori stock buttons

PCB-
=NEED INFO/DETAILS

Wiring-
+Quick disconnects for buttons allowing easy swap
=Unsure if joystick connection is 5 pin or soldered on individual microswitches

Cable-
=PS2/PS1 connector exits plastic base
=No cord compartment

Unanswered Questions Due to Insufficient Testing-
=TO EDIT

Hori-CFJ-01.jpg

Hori RAP CFJ
=Hori Capcom Fighting Jam

SRKTT thread-
=Unknown

Case-
RAP Base
=Weight
=One main plastic base. Does not have individual plastic pieces
+Same design/production base by major company for multiple consoles made swapping parts and getting 3rd party support easier
=Interior of case has plenty of space for mounting PCBs
=Must open from bottom (Which voids the warranty)

Metal Panels-
+Both top and bottom metal panels

Plexi/Art-
=No default plexi
=Plexi options available via Tek Innovations
=Nuts and bolts for top metal panel are difficult to remove and assemble
=Top loaders available via Tek Innovations allowing removal and assembly of top metal panel easier

Bottom Padding/Feet-
=No padding
=Four rubber feet

Joystick-
+Sanwa JLF-TP-8Y-SK


Buttons-
-Hori stock buttons

PCB-
=NEED INFO/DETAILS

Wiring-
+Quick disconnects for buttons allowing easy swap
=Unsure if joystick connection is 5 pin or soldered on individual microswitches

USB Cable-
=PS2/PS1 connector exits plastic base
=No cord compartment

Unanswered Questions Due to Insufficient Testing-
=TO EDIT

Hori-RAP1-Orange-01.jpg

Hori RAP1
-Hori Real Arcade Pro Orange Amazon Exclusive

SRKTT thread-
=Unknown

Case-
RAP Base
=Weight
=One main plastic base. Does not have individual plastic pieces
+Same design/production base by major company for multiple consoles made swapping parts and getting 3rd party support easier
=Interior of case has plenty of space for mounting PCBs
=Must open from bottom (Which voids the warranty)

Metal Panels-
+Both top and bottom metal panels

Plexi/Art-
=No default plexi
=Plexi options available via Tek Innovations
=Nuts and bolts for top metal panel are difficult to remove and assemble
=Top loaders available via Tek Innovations allowing removal and assembly of top metal panel easier

Bottom Padding/Feet-
=No padding
=Four rubber feet

Joystick-
+Sanwa JLF-TP-8Y-SK

Buttons-
-Hori stock buttons

PCB-
=NEED INFO/DETAILS

Wiring-
=NEED INFO/DETAILS

USB Cable-
=PS2/PS1 connector exits plastic base
=No cord compartment

Unanswered Questions-
=What is the official title for this arcade stick from Hori?
=TO EDIT

Hori-RAP1SA-01.jpg

Hori RAP1 SA
=Hori Real Arcade Pro Special Addition
=Special Addition also can be viewed as Hori's way of saying Sanwa (SA)

SRKTT thread-
=Unknown

Case-
RAP Base
=Weight
=One main plastic base. Does not have individual plastic pieces
+Same design/production base by major company for multiple consoles made swapping parts and getting 3rd party support easier
=Interior of case has plenty of space for mounting PCBs

Metal Panels-
+Both top and bottom metal panels

Plexi/Art-
=No default plexi
=Plexi options available via Tek Innovations
+Easy Top Panel access through Hex key

Bottom Padding/Feet-
=No padding
=Four rubber feet

Joystick-
+Sanwa JLF-TP-8Y-SK

Buttons-
-Sanwa OBSF-30RG and OBSF-24 in custom Vermilion color

PCB-
=NEED INFO/DETAILS

Wiring-
=NEED INFO/DETAILS

USB Cable-
=PS2/PS1 connector exits plastic base
=No cord compartment

Unanswered Questions Due to Insufficient Testing-
=TO EDIT

Hori-RAP1SE-01.jpg

Hori RAP1 SE
=Hori Real Arcade Pro Special Edition
=Special Edition also can be viewed as Hori's way of saying Seimitsu (SE)

SRKTT thread-
=Unknown

Case-
RAP Base
=Weight
=One main plastic base. Does not have individual plastic pieces
+Same design/production base by major company for multiple consoles made swapping parts and getting 3rd party support easier
=Interior of case has plenty of space for mounting PCBs

Metal Panels-
+Both top and bottom metal panels

Plexi/Art-
=No default plexi
=Plexi options available via Tek Innovations
+Easy Top Panel access through Hex key

Bottom Padding/Feet-
=No padding
=Four rubber feet

Joystick-
+Seimitsu LS-32-01

Buttons-
-Seimitsu PS-14-GX

PCB-
=NEED INFO/DETAILS

Wiring-
=NEED INFO/DETAILS

USB Cable-
=PS2/PS1 connector exits plastic base
=No cord compartment

Unanswered Questions Due to Insufficient Testing-
=TO EDIT

Hori-AH1-01.jpg

Hori AH1
=Hori Arcana Heart Arcade Stick
(unsure of official title since it's difficult to find data on now)

SRKTT thread-
=Unknown

Case-
RAP Base
=Weight (___________)
=One main plastic base. Does not have individual plastic pieces
+Same design/production base by major company for multiple consoles made swapping parts and getting 3rd party support easier
=Interior of case has plenty of space for mounting PCBs

Metal Panels-
+Both top and bottom metal panels

Plexi/Art-
=No default plexi
=Plexi options available via Tek Innovations
+Easy Top Panel access through Hex key

Bottom Padding/Feet-
=No padding
=Four rubber feet

Joystick-
+Sanwa JLF-TP-8Y-SK

Buttons-
-Hori stock buttons

PCB-
=NEED INFO/DETAILS

Wiring-
-Buttons mounted on PCB instead of having own quick disconnects

USB Cable-
=PS2/PS1 connector exits plastic base
=No cord compartment

Unanswered Questions Due to Insufficient Testing-
=TO EDIT

Hori-AH2-01.jpg

Hori AH2
=Hori Arcana Heart 2 Arcade Stick
(unsure of official title since it's difficult to find data on now)

SRKTT thread-
=Unknown

Case-
RAP Base
=Weight (___________)
=One main plastic base. Does not have individual plastic pieces
+Same design/production base by major company for multiple consoles made swapping parts and getting 3rd party support easier
=Interior of case has plenty of space for mounting PCBs

Metal Panels-
+Both top and bottom metal panels

Plexi/Art-
=No default plexi
=Plexi options available via Tek Innovations
+Easy Top Panel access through Hex key

Bottom Padding/Feet-
=No padding
=Four rubber feet

Joystick-
=NEED INFO/DETAILS

Buttons-
=NEED INFO/DETAILS

PCB-
=NEED INFO/DETAILS

Wiring-
-Buttons mounted on PCB instead of having own quick disconnects

USB Cable-
=PS2/PS1 connector exits plastic base
=No cord compartment

Unanswered Questions Due to Insufficient Testing-
=TO EDIT

Hori-FUC-01.jpg

Hori FUC-LE
=Hori Real Arcade Pro Stick Fate/Unlimited Codes Limited Edition
(unsure of official title since it's difficult to find data on now)

SRKTT thread-
=Unknown

Case-
RAP Base
=Weight (___________)
=One main plastic base. Does not have individual plastic pieces
+Same design/production base by major company for multiple consoles made swapping parts and getting 3rd party support easier
=Interior of case has plenty of space for mounting PCBs
=Must open from bottom (Which voids the warranty)

Metal Panels-
+Both top and bottom metal panels

Plexi/Art-
=No default plexi
=Plexi options available via Tek Innovations
=Nuts and bolts for top metal panel are difficult to remove and assemble
=Top loaders available via Tek Innovations allowing removal and assembly of top metal panel easier

Bottom Padding/Feet-
=No padding
=Four rubber feet

Joystick-
=NEED INFO/DETAILS

Buttons-
=NEED INFO/DETAILS

PCB-
=NEED INFO/DETAILS

Wiring-
=NEED INFO/DETAILS

USB Cable-
=PS2/PS1 connector exits plastic base
=No cord compartment

Unanswered Questions Due to Insufficient Testing-
=TO EDIT

Hori-RAP2-01.jpg

Hori RAP2
=Hori Real Arcade Pro 2

SRKTT thread-
=Unknown

Case-
RAP Base
=Weight (2.6 kg)
=Sizes - Width = 412mm, Depth = 243mm, Height (including lever) = 135mm
=One main plastic base. Does not have individual plastic pieces
+Same design/production base by major company for multiple consoles made swapping parts and getting 3rd party support easier
=Interior of case has plenty of space for mounting PCBs
=Must open from bottom (Which voids the warranty)

Metal Panels-
+Both top and bottom metal panels

Plexi/Art-
=No default plexi
=Plexi options available via Tek Innovations
=Nuts and bolts for top metal panel are difficult to remove and assemble
=Top loaders available via Tek Innovations allowing removal and assembly of top metal panel easier

Bottom Padding/Feet-
=No padding
=Four rubber feet

Joystick-
+Sanwa JLF-TP-8Y-SK

Buttons-
-Hori stock buttons

PCB-
=NEED INFO/DETAILS

Wiring-
=NEED INFO/DETAILS

USB Cable-
=PS2/PS1 connector exits plastic base
=No cord compartment

Unanswered Questions Due to Insufficient Testing-
=TO EDIT

Hori-RAP2SA-01.jpg

Hori RAP2 SA
=Hori Real Arcade Pro 2 Special Addition
=Special Addition also can be viewed as Hori's way of saying Sanwa (SA)

SRKTT thread-
=Unknown

Case-
RAP Base
=Weight
=One main plastic base. Does not have individual plastic pieces
+Same design/production base by major company for multiple consoles made swapping parts and getting 3rd party support easier
=Interior of case has plenty of space for mounting PCBs

Metal Panels-
+Both top and bottom metal panels

Plexi/Art-
=No default plexi
=Plexi options available via Tek Innovations
+Easy Top Panel access through Hex key

Bottom Padding/Feet-
=No padding
=Four rubber feet

Joystick-
+Sanwa JLF-TP-8Y-SK

Buttons-
-Sanwa OBSF-30 (Blue) and OBSF-24 (Dark Hai specifically made for this stick)

PCB-
=NEED INFO/DETAILS

Wiring-
=NEED INFO/DETAILS

USB Cable-
=PS2/PS1 connector exits plastic base
=No cord compartment

Unanswered Questions Due to Insufficient Testing-
=TO EDIT

Hori-SCIII-01.jpg

HRAP SCIII
=Hori Real Arcade Pro Soul Calibur III

SRKTT thread-
=Unknown

Case-
RAP Base
=Weight
=One main plastic base. Does not have individual plastic pieces
+Same design/production base by major company for multiple consoles made swapping parts and getting 3rd party support easier
=Interior of case has plenty of space for mounting PCBs
=Must open from bottom (Which voids the warranty)

Metal Panels-
+Both top and bottom metal panels

Plexi/Art-
=No default plexi
=Plexi options available via Tek Innovations
=Nuts and bolts for top metal panel are difficult to remove and assemble
=Top loaders available via Tek Innovations allowing removal and assembly of top metal panel easier

Bottom Padding/Feet-
=No padding
=Four rubber feet

Joystick-
=NEED INFO/DETAILS

Buttons-
-Hori stock buttons

PCB-
=NEED INFO/DETAILS

Wiring-
-Buttons mounted on PCB instead of having own quick disconnects

USB Cable-
=PS2/PS1 connector exits plastic base
=No cord compartment

Unanswered Questions Due to Insufficient Testing-
=TO EDIT

Hori-Tekken5JP-01.jpg

HRAP Tekken 5 JP
=Hori Real Arcade Pro Tekken 5

SRKTT thread-
=Unknown

Case-
RAP Base
=Weight
=One main plastic base. Does not have individual plastic pieces
+Same design/production base by major company for multiple consoles made swapping parts and getting 3rd party support easier
=Interior of case has plenty of space for mounting PCBs
=Must open from bottom (Which voids the warranty)

Metal Panels-
+Both top and bottom metal panels

Plexi/Art-
=No default plexi
=Plexi options available via Tek Innovations
=Nuts and bolts for top metal panel are difficult to remove and assemble
=Top loaders available via Tek Innovations allowing removal and assembly of top metal panel easier

Bottom Padding/Feet-
=No padding
=Four rubber feet

Joystick-
+Sanwa JLF-TP-8Y-SK

Buttons-
-Hori stock buttons

PCB-
=NEED INFO/DETAILS

Wiring-
=NEED INFO/DETAILS

USB Cable-
=PS2/PS1 connector exits plastic base
=No cord compartment

Unanswered Questions Due to Insufficient Testing-
=TO EDIT

Hori-Tekken5US-01.jpg

HRAP Tekken 5 10th Anniversary
=Hori Real Arcade Pro Tekken 10th Anniversary

SRKTT thread-
=Unknown

Case-
RAP Base
=Weight
=One main plastic base. Does not have individual plastic pieces
+Same design/production base by major company for multiple consoles made swapping parts and getting 3rd party support easier
=Interior of case has plenty of space for mounting PCBs
=Must open from bottom (Which voids the warranty)

Metal Panels-
+Both top and bottom metal panels

Plexi/Art-
=No default plexi
=Plexi options available via Tek Innovations
=Nuts and bolts for top metal panel are difficult to remove and assemble
=Top loaders available via Tek Innovations allowing removal and assembly of top metal panel easier

Bottom Padding/Feet-
=No padding
=Four rubber feet

Joystick-
-Hori

Buttons-
-Hori stock buttons

PCB-
=NEED INFO/DETAILS

Wiring-
=NEED INFO/DETAILS

USB Cable-
=PS2/PS1 connector exits plastic base
=No cord compartment

Unanswered Questions Due to Insufficient Testing-
=TO EDIT


Playstation 3
Playstation 3
Playstation 3
Playstation 3
Playstation 3


Spoiler
Hori-RAP3-01.jpg

HRAP3
=Hori Real Arcade Pro 3

SRKTT thread-
=Unknown

Case-
RAP Base
=Weight
=One main plastic base. Does not have individual plastic pieces
+Same design/production base by major company for multiple consoles made swapping parts and getting 3rd party support easier
=Interior of case has plenty of space for mounting PCBs
=Must open from bottom (Which voids the warranty)

Metal Panels-
+Both top and bottom metal panels
+Easy Top Panel access through Hex key

Plexi/Art-
=No default plexi
=Plexi options available via Tek Innovations
=Top loaders available via Tek Innovations allowing removal and assembly of top metal panel easier

Bottom Padding/Feet-
=No padding
=Four rubber feet

Joystick-
+Sanwa JLF-TP-8Y-SK

Buttons-
-Hori stock buttons

PCB-
=NEED INFO/DETAILS

Wiring-
=NEED INFO/DETAILS

USB Cable-
=PS3 cable exits base on back
=No cord compartment

Unanswered Questions Due to Insufficient Testing-
=TO EDIT

Hori-RAP3SA-01.jpg

HRAP3 SA
=Hori Real Arcade Pro. SA

SRKTT thread-
=Unknown

Case-
RAP Base
=Weight ___________
=One main plastic base. Does not have individual plastic pieces
+Same design/production base by major company for multiple consoles made swapping parts and getting 3rd party support easier
=Interior of case has plenty of space for mounting PCBs
=Must open from bottom (Which voids the warranty)

Metal Panels-
+Both top and bottom metal panels

Plexi/Art-
=No default plexi
=Plexi options available via Tek Innovations
=Nuts and bolts for top metal panel are difficult to remove and assemble
=Top loaders available via Tek Innovations allowing removal and assembly of top metal panel easier

Bottom Padding/Feet-
=No padding
=Four rubber feet

Joystick-
+Sanwa JLF-TP-8Y-SK

Buttons-
+Sanwa OBSF-30, OBSF-24

PCB-
=NEED INFO/DETAILS

Wiring-
=NEED INFO/DETAILS

USB Cable-
=PS3 cable exits base on back
=No cord compartment

Unanswered Questions Due to Insufficient Testing-
=TO EDIT

Hori-RAP3-SE-01.jpg

Hori RAP 3 SE
=Hori Real Arcade Pro. 3 SE

SRKTT thread-
=Unknown

Case-
RAP Base
=Weight (2.6 kg)
=Sizes - Width = 412mm, Depth = 243mm, Height (including lever) = 135mm
=One main plastic base. Does not have individual plastic pieces
+Same design/production base by major company for multiple consoles made swapping parts and getting 3rd party support easier
=Interior of case has plenty of space for mounting PCBs

Metal Panels-
+Both top and bottom metal panels
+Easy Top Panel access through Hex key
+Universal Joystick mount

Plexi/Art-
=No default plexi
=Plexi options available via Tek Innovations

Bottom Padding/Feet-
=No padding
=Four rubber feet

Joystick-
+Seimtisu LS-32-01

Buttons-
+Seimitsu PS-14-G, PS-14-D

PCB-
=same as HRAP 3

Wiring-
+Buttons are quick disconnects
+5-pin Joystick Harness

USB Cable-
=USB 2.0
=No cord compartment

Unanswered Questions Due to Insufficient Testing-
=TO EDIT

Hori-RAP3AA-01.jpg

Hori RAP 3 Amazon JP
=Hori Real Arcade Pro Amazon.co.jp Edition

SRKTT thread-
=Unknown

Case-
RAP Base
=Weight (2.6 kg)
=Sizes - Width = 412mm, Depth = 243mm, Height (including lever) = 135mm
=One main plastic base. Does not have individual plastic pieces
+Same design/production base by major company for multiple consoles made swapping parts and getting 3rd party support easier
=Interior of case has plenty of space for mounting PCBs


Metal Panels-
+Both top and bottom metal panels
+Easy Top Panel access through Hex key
+Universal Joystick mount

Plexi/Art-
=No default plexi
=Plexi options available via Tek Innovations

Bottom Padding/Feet-
=No padding
=Four rubber feet

Joystick-
+Sanwa JLF-TP-8Y-SK

Buttons-
-HORI stock buttons

PCB-
=same as HRAP 3

Wiring-
+Buttons are quick disconnects
+5-pin Joystick Harness

USB Cable-
=USB 2.0
=No cord compartment

Unanswered Questions Due to Insufficient Testing-
=TO EDIT

Hori-RAP-N3-SA-01.jpg

Hori RAP N3 SA
=Hori Real Arcade Pro N3-SA

Release date: 2014

SRKTT thread-
=Unknown

Case-
RAP Base
=Weight (2.6 kg)
=Sizes - Width = 412mm, Depth = 243mm, Height (including lever) = 135mm
=One main plastic base. Does not have individual plastic pieces
+Same design/production base by major company for multiple consoles made swapping parts and getting 3rd party support easier
=Interior of case has plenty of space for mounting PCBs
=Must open from bottom (Which voids the warranty)
=Unique door over recessed mounting for Start button slides into pocket within case when opened.

Metal Panels-
+Both top and bottom metal panels

Plexi/Art-
=No default plexi
=Plexi options available via Tek Innovations
=Top panel bolts can be removed with Allen key for easy installation of plexi and art.

Bottom Padding/Feet-
=No padding
=Four rubber feet

Joystick-
+Sanwa JLF

Buttons-
+Sanwa OBSF-30

PCB-
=Common ground

Wiring-
=Buttons have quick disconnect wiring
=Joystick has 5-pin JST connector

USB Cable-
=USB 2.0
=Plastic door cord compartment

Hori-RAPBlaz-01.jpg

Hori RAP 3 BlazBlue
=Hori Real Arcade Pro. 3 BlazBlue

SRKTT thread-
=Unknown

Case-
RAP Base
=Weight (2.6 kg)
=Sizes - Width = 412mm, Depth = 243mm, Height (including lever) = 135mm
=One main plastic base. Does not have individual plastic pieces
+Same design/production base by major company for multiple consoles made swapping parts and getting 3rd party support easier
=Interior of case has plenty of space for mounting PCBs
=Must open from bottom (Which voids the warranty)
+Exclusive blue case

Metal Panels-
+Both top and bottom metal panels
-Two-point Joystick Mount (Seimtisu VF/JLF Wings)

Plexi/Art-
=No default plexi
=Plexi options available via Tek Innovations

Bottom Padding/Feet-
=No padding
=Four rubber feet

Joystick-
+Sanwa JLF-TP-8Y-SK

Buttons-
-HORI stock buttons

PCB-
=same as HRAP 3

Wiring-
-Buttons are PCB Mounted
+5-pin Joystick Harness

USB Cable-
=USB 2.0
=No cord compartment

Unanswered Questions Due to Insufficient Testing-
=TO EDIT

Hori-DoA5-PS3-01.jpg

Hori RAP Dead or Alive 5
=Hori Real Arcade Dead or Alive 5

Release date: 2012

SRKTT thread-
=Unknown

Case-
RAP Base
=Weight (2.6 kg)
=Sizes - Width = 412mm, Depth = 243mm, Height (including lever) = 135mm
=One main plastic base. Does not have individual plastic pieces
+Same design/production base by major company for multiple consoles made swapping parts and getting 3rd party support easier
=Interior of case has plenty of space for mounting PCBs
=Must open from bottom (Which voids the warranty)
= Unique door over recessed mounting for Start button slides into pocket within case when opened.

Metal Panels-
+Both top and bottom metal panels

Plexi/Art-
=No default plexi
=Plexi options available via Tek Innovations
=Top panel bolts can be removed with Allen key for easy installation of plexi and art.

Bottom Padding/Feet-
=No padding
=Four rubber feet

Joystick-
+Sanwa JLF

Buttons-
+Sanwa OBSF-30

PCB-
=Both common ground

Wiring-
=Buttons have quick disconnect wiring
=Joystick has 5-pin JST connector


USB Cable-
=USB 2.0
=Plastic door cord compartment


Hori-RAP-MSGEVS-01.jpg

Hori RAP Mobile Suit Gundam: Extreme V.S.
=Hori Real Arcade Mobile Suit Gundam: Extreme V.S.

Release date: 2011

SRKTT thread-
=Unknown

Case-
RAP Base
=Weight (2.6 kg)
=Sizes - Width = 412mm, Depth = 243mm, Height (including lever) = 135mm
=One main plastic base. Does not have individual plastic pieces
+Same design/production base by major company for multiple consoles made swapping parts and getting 3rd party support easier
=Interior of case has plenty of space for mounting PCBs
=Must open from bottom (Which voids the warranty)
=Unique door over recessed mounting for Start button slides into pocket within case when opened.

Metal Panels-
+Both top and bottom metal panels

Plexi/Art-
=No default plexi
=Plexi options available via Tek Innovations
=Top panel bolts can be removed with Allen key for easy installation of plexi and art.

Bottom Padding/Feet-
=No padding
=Four rubber feet

Joystick-
+Sanwa JLF-TP-8Y-SK with dark blue balltop

Buttons-
+Sanwa OBSF-30

PCB-
=Common ground

Wiring-
=Buttons have quick disconnect wiring
=Joystick has 5-pin JST connector

USB Cable-
=USB 2.0
=Plastic door cord compartment

Hori-RAP-MSGEVSFB-01.jpg

Hori RAP Mobile Suit Gundam: Extreme V.S. Full Boost
=Hori Real Arcade Pro AX S+G

Release date: 2014

SRKTT thread-
=Unknown

Case-
RAP Base
=Weight (2.6 kg)
=Sizes - Width = 412mm, Depth = 243mm, Height (including lever) = 135mm
=One main plastic base. Does not have individual plastic pieces
+Same design/production base by major company for multiple consoles made swapping parts and getting 3rd party support easier
=Interior of case has plenty of space for mounting PCBs
=Must open from bottom (Which voids the warranty)
=Unique door over recessed mounting for Start button slides into pocket within case when opened.
=Full Boost version is the only version with transparent door over Start button.

Metal Panels-
+Both top and bottom metal panels

Plexi/Art-
=No default plexi
=Plexi options available via Tek Innovations
=Top panel bolts can be removed with Allen key for easy installation of plexi and art.

Bottom Padding/Feet-
=No padding
=Four rubber feet

Joystick-
+Sanwa JLF

Buttons-
+Sanwa OBSF-30

PCB-
=Common ground

Wiring-
=Buttons have quick disconnect wiring
=Joystick has 5-pin JST connector

USB Cable-
=USB 2.0
=Plastic doored cord compartment

Hori-SFIV-01.jpg

Hori SFIV
=Hori Street Fighter IV Arcade Stick
(unsure if this is "official" title)
(Does not have RAP in the name but is same build/parts)

SRKTT thread-
=Unknown

Case-
RAP Base
=Weight (2.6 kg)
=Sizes - Width = 412mm, Depth = 243mm, Height (including lever) = 135mm
=One main plastic base. Does not have individual plastic pieces
+Same design/production base by major company for multiple consoles made swapping parts and getting 3rd party support easier
=Interior of case has plenty of space for mounting PCBs
=Must open from bottom (Which voids the warranty)
=Black case


Metal Panels-
+Both top and bottom metal panels
-Two-point Joystick Mount (Seimtisu VF/JLF Wings)

Plexi/Art-
=No default plexi
=Plexi options available via Tek Innovations
=Red/Black theme with Ryu & Ken

Bottom Padding/Feet-
=No padding
=Four rubber feet

Joystick-
+Sanwa JLF-TP-8Y-SK with Red Balltop

Buttons-
-HORI stock buttons (Red)

PCB-
=same as HRAP 3 (assumed)

Wiring-
-Buttons mounted on PCB instead of having own quick disconnects
=Unsure whether joystick is 5 pin harness or individual soldered on microswitches

USB Cable-
=USB 2.0
=No cord compartment

Unanswered Questions Due to Insufficient Testing-
=TO EDIT

Hori-RAP-SCV-01.jpg

Hori RAP Soul Caliber V
=Hori Real Arcade Pro Soul Caliber V

Release date: 2012

SRKTT thread-
=Unknown

Case-
RAP Base
=Weight (2.6 kg)
=Sizes - Width = 412mm, Depth = 243mm, Height (including lever) = 135mm
=One main plastic base. Does not have individual plastic pieces
+Same design/production base by major company for multiple consoles made swapping parts and getting 3rd party support easier
=Interior of case has plenty of space for mounting PCBs
=Must open from bottom (Which voids the warranty)
= Unique door over recessed mounting for Start button slides into pocket within case when opened.

Metal Panels-
+Both top and bottom metal panels

Plexi/Art-
=No default plexi
=Plexi options available via Tek Innovations
=Top panel bolts can be removed with Allen key for easy installation of plexi and art.

Bottom Padding/Feet-
=No padding
=Four rubber feet

Joystick-
+Sanwa JLF

Buttons-
+Sanwa OBSF-30

PCB-
=Both common ground

Wiring-
=Buttons have quick disconnect wiring
=Joystick has 5-pin JST connector

USB Cable-
=USB 2.0
=Plastic door cord compartment

Hori-RAP3-Tekken6-01.jpg

Hori RAP 3 Tekken 6
=Hori Real Arcade Pro. 3 Tekken 6

SRKTT thread-
=Unknown

Case-
RAP Base
=Weight (2.6 kg)
=Sizes - Width = 412mm, Depth = 243mm, Height (including lever) = 135mm
=One main plastic base. Does not have individual plastic pieces
+Same design/production base by major company for multiple consoles made swapping parts and getting 3rd party support easier
=Interior of case has plenty of space for mounting PCBs
=Must open from bottom (Which voids the warranty)
=Black base

Metal Panels-
+Both top and bottom metal panels

Plexi/Art-
=No default plexi

Bottom Padding/Feet-
=No padding
=Four rubber feet

Joystick-
=Type of joystick unknown (Black balltop)

Buttons-
=Type of button unknown (Dark Hai color)

PCB-
=Same as HRAP 3 (Assumed)

Wiring-
=Unsure if buttons are quick disconnects or soldered to PCB
=Unsure if joystick is 5-pin harness or soldered to microswitches

USB Cable-
=USB 2.0
=No cord compartment

Unanswered Questions Due to Insufficient Testing-
=TO EDIT

Hori-TTT2P-01.jpg

Hori RAP 3 Tekken Tag 2 Prologue
=Hori Real Arcade Pro. 3 Tekken Tag 2 Prologue
+Last ever Original HRAP design produced

SRKTT thread-
=Unknown

Case-
RAP Base
=Weight (2.6 kg)
=Sizes - Width = 412mm, Depth = 243mm, Height (including lever) = 135mm
=One main plastic base. Does not have individual plastic pieces
+Same design/production base by major company for multiple consoles made swapping parts and getting 3rd party support easier
=Interior of case has plenty of space for mounting PCBs
=Must open from bottom (Which voids the warranty)

Metal Panels-
+Both top and bottom metal panels
-Two-point Joystick Mount (Seimtisu VF/JLF Wings), uses the JLF mounting plate points
+Namco NOIR Layout

Plexi/Art-
=No default plexi

Bottom Padding/Feet-
=No padding
=Four rubber feet

Joystick-
+Sanwa JLF-TP-8Y-SK

Buttons-
-HORI stock buttons

PCB-
=Same as HRAP 3

Wiring-
+Buttons are quick disconnects
+5-pin Joystick Harness

USB Cable-
=USB 2.0
=No cord compartment

Unanswered Questions Due to Insufficient Testing-
=TO EDIT


Hori-RAP-TTT2-01.jpg

Hori RAP Tekken Tag Tournament 2
=Hori Real Arcade Pro Tekken Tag Tournament 2

Release date: 2011

SRKTT thread-
=Unknown

Case-
RAP Base
=Weight (2.6 kg)
=Sizes - Width = 412mm, Depth = 243mm, Height (including lever) = 135mm
=One main plastic base. Does not have individual plastic pieces
+Same design/production base by major company for multiple consoles made swapping parts and getting 3rd party support easier
=Interior of case has plenty of space for mounting PCBs
=Must open from bottom (Which voids the warranty)
= Unique door over recessed mounting for Start button slides into pocket within case when opened.

Metal Panels-
+Both top and bottom metal panels

Plexi/Art-
=No default plexi
=Plexi options available via Tek Innovations
=Top panel bolts can be removed with Allen key for easy installation of plexi and art.

Bottom Padding/Feet-
=No padding
=Four rubber feet

Joystick-
+Sanwa JLF

Buttons-
+Sanwa OBSF-30

PCB-
=Both common ground

Wiring-
=Button s have quick disconnect wiring
=Joystick has 5-pin JST connector

USB Cable-
=USB 2.0
=Plastic doored cord compartment


Playstation 4 / Playstation 3


Spoiler

Hori-HRAPv4-01.png

Hori RAP V4
=Hori Real Arcade Pro V4 Hayabusa for PS4 & PS3

SRKTT thread-
http://forums.shoryuken.com/discussion/189004/hori-hrap-v4-announced-compatible-with-ps3-and-ps4/p1

Case-
Hori Case (Same as RAPV3/RAPVX/UMvC3/DoA models for PS3/360)
=One main plastic base. Does not have individual plastic pieces.
=Sizes - Width = 430mm, Depth = 240mm, Height (including lever) = 125mm
=Weight (2.2kg)
=Interior of case has plenty of space for mounting PCBs
=Must open from bottom (Which voids the warranty)

Metal Panels-
+Both top and bottom metal panels

Plexi/Art-
=No default plexi
=Default artwork can leave a sticky residue when removing
+Tek Innovations does have plexi option (Same as V3/VX non-Kai)

Bottom Padding/Feet-
=No padding
=Four small rubber feet

Joystick-
=Hori Hayabusa joystick

Buttons-
=Hori Kuro buttons

PCB-
=Common ground. Unsure if active high/low. Unsure if able to multi-mod without complications due to insufficient testing.
+Easy to remove main PCB from base
=Button signals/grounds, and USB cable are soldered to PCB while joystick connector and ribbon cables to Turbo/Home PCB are removable from main PCB

Wiring-
=Typical

USB Cable-
=Wire and cord compartment

Unanswered Questions Due to Insufficient Testing-
-Is the PCB possible to multi-mod with? We know it's common ground, but we don't have if is active high/low.

Hori-HRAPv4SILENT-01.png

Hori RAP V4 Silent
=Hori Real Arcade Pro V4 Silent Hayabusa for PS4 & PS3

SRKTT thread-
http://forums.shoryuken.com/discussion/189004/hori-hrap-v4-announced-compatible-with-ps3-and-ps4/p1
(Same thread as non-silent version)

Case-
Hori Case (Same as RAPV3/RAPVX/UMvC3/DoA models for PS3/360)
=One main plastic base. Does not have individual plastic pieces.
=Sizes - Width = 430mm, Depth = 240mm, Height (including lever) = 125mm
=Weight (2.2kg)
=Interior of case has plenty of space for mounting PCBs
=Must open from bottom (Which voids the warranty)

Metal Panels-
+Both top and bottom metal panels

Plexi/Art-
=No default plexi
=Default artwork can leave a sticky residue when removing
+Tek Innovations does have plexi option (Same as V3/VX non-Kai)

Bottom Padding/Feet-
=No padding
=Four small rubber feet

Joystick-
=Hori Hayabusa joystick with optical switches

Buttons-
=Hori Kuro buttons with silencer pads

PCB-
=Common ground. Unsure if active high/low. Unsure if able to multi-mod without complications due to insufficient testing.
+Easy to remove main PCB from base
-Button signals/grounds, and USB cable are soldered to PCB while joystick connector and ribbon cables to Turbo/Home PCB are removable from main PCB

Wiring-
=Typical

USB Cable-
=Wire and cord compartment

Unanswered Questions Due to Insufficient Testing-
=Is the PCB possible to multi-mod with? We know it's common ground, but we don't have if is active high/low.

Hori-HRAP4KAI-01.png

Hori RAP 4 Kai
=Hori Real Arcade Pro 4 Kai for PS4 & PS3

SRKTT thread-
http://forums.shoryuken.com/discussion/195974/hrap4-kai-initial-impressions
(Same thread as HRAP 4 Kai/HRAP.V Hayabusa)

Case-
Hori Case (New form factor upgrade from RAPV3/RAPVX/RAPV4 style where buttons are now on the side instead of on top/face)
=One main plastic base. Does not have individual plastic pieces.
=Sizes: Width = 430mm, Depth = 237mm, Height (including lever) = 114mm
=Weight (2.2kg)
=Interior of case has plenty of space for mounting PCBs
=Must open from bottom (Which voids the warranty)
=PS4 touch panel on back

Metal Panels-
+Both top and bottom metal panels
=RAP 4 Kai has Vewlix layout with wider spread between joystick and buttons

Plexi/Art-
=No default plexi
=Default artwork can leave a sticky residue when removing
=Undetermined whether a plexi via Tek Innovations for V3/VX would still fit properly. Even if changed, it's unlikely they wouldn't have a plexi for it in the near future.

Bottom Padding/Feet-
=Padding on bottom where stick sits on legs
=No feet

Joystick-
=Hori Hayabusa joystick

Buttons-
=Hori Kuro buttons

PCB-
=Common ground PCB (Same as HRAP 4 Kai/HRAP.V/DoA5LR)
=Multiple PCBs (main PCB, side PCB, touch screen)
=Touch screen PCB is connected to main PCB using a small ribbon cable
=Side PCB is connected to main PCB using two standard molex style connectors
=Joystick is connected to main PCB using a standard molex style connector
=Buttons are connected to main PCB by solder and glue
=USB cable is connected to main PCB by using a standard molex style connector

Wiring-
-Signal/Ground wires are soldered on to buttons

USB Cable-
=Wire and cord compartment
=Cable length (3m)

Unanswered Questions Due to Insufficient Testing-
=Is the PCB the same for both models of this body type?
=Is the PCB possible to multi-mod with? We know it's common ground, but we don't have if is active high/low.

Hori-HRAP5-01.png

Hori RAP.V
=Hori Real Arcade Pro.V Hayabusa for PS4 & PS3

SRKTT thread-
http://forums.shoryuken.com/discussion/195974/hrap4-kai-initial-impressions
(Same thread as HRAP 4 Kai/HRAP.V Hayabusa)

Case-
Hori Case (New form factor upgrade from RAPV3/RAPVX/RAPV4 style where buttons are now on the side instead of on top/face)
=One main plastic base. Does not have individual plastic pieces.
=Sizes: Width = 430mm, Depth = 237mm, Height (including lever) = 114mm
=Weight (2.2kg)
=Interior of case has plenty of space for mounting PCBs
=Must open from bottom (Which voids the warranty)
=PS4 touch panel on back

Metal Panels-
+Both top and bottom metal panels
=Vewlix layout with standard spread between joystick and buttons

Plexi/Art-
=No default plexi
=Default artwork can leave a sticky residue when removing
=Undetermined whether a plexi via Tek Innovations for V3/VX would still fit properly. Even if changed, it's unlikely they wouldn't have a plexi for it in the near future.

Bottom Padding/Feet-
=No padding
=Four small rubber feet

Joystick-
=Hori Hayabusa joystick

Buttons-
=Hori Kuro buttons

PCB-
=Common ground PCB (Same as HRAP 4 Kai/HRAP.V/DoA5LR)
=Multiple PCBs (main PCB, side PCB, touch screen)
=Touch screen PCB is connected to main PCB using a small ribbon cable
=Side PCB is connected to main PCB using two standard molex style connectors
=Joystick is connected to main PCB using a standard molex style connector
=Buttons are connected to main PCB by solder and glue
=USB cable is connected to main PCB by using a standard molex style connector

Wiring-
-Signal/Ground wires are soldered on to buttons

USB Cable-
=Wire and cord compartment
=Cable length (3m)

Unanswered Questions Due to Insufficient Testing-
=Is the PCB possible to multi-mod with? We know it's common ground, but we don't have if is active high/low.

Hori-DoA5LR-01.png

Hori DoA5LR
=Hori Dead or Alive 5 Last Round for PS4 & PS3
(Not technically an HRAP as it has no "Real Arcade Pro" in the title, but uses same PCB and case as other HRAPs)

SRKTT thread (DoA5LR)-
http://forums.shoryuken.com/discussion/194638/hori-ps4-ps3-dead-or-alive-5-last-round-stick/p1

Case-
Hori Case (New form factor upgrade from RAPV3/RAPVX/RAPV4 style where buttons are now on the side instead of on top/face)
=One main plastic base. Does not have individual plastic pieces.
=Sizes: Width = 430mm, Depth = 237mm, Height (including lever) = 114mm
=Weight (2.2kg)
=Interior of case has plenty of space for mounting PCBs
=Must open from bottom (Which voids the warranty)
=PS4 touch panel on back
=DoA5LR has an extra piece connected to front middle of case with analog sticks. Unsure if removable yet due to insufficient testing

Metal Panels-
+Both top and bottom metal panels
=Vewlix layout with standard spread between joystick and buttons

Plexi/Art-
=No default plexi
=Default artwork can leave a sticky residue when removing
=Undetermined whether a plexi via Tek Innovations for V3/VX would still fit properly. Even if changed, it's unlikely they wouldn't have a plexi for it in the near future.

Bottom Padding/Feet-
=No padding
=Four small rubber feet

Joystick-
=Hori Hayabusa joystick

Buttons-
=Hori Kuro buttons
=Signal/Ground wires are soldered on to buttons

PCB-
=Common ground PCB (Same as HRAP 4 Kai/HRAP.V/DoA5LR)
=Multiple PCBs (main PCB, side PCB, touch screen)
=Touch screen PCB is connected to main PCB using a small ribbon cable
=Side PCB is connected to main PCB using two standard molex style connectors
=Joystick is connected to main PCB using a standard molex style connector
=Buttons are connected to main PCB by solder and glue
=USB cable is connected to main PCB by using a standard molex style connector

Wiring-
=Typical

USB Cable-
=Wire and cord compartment
=Cable length (3m)

Unanswered Questions Due to Insufficient Testing-
-Is the PCB possible to multi-mod with? We know it's common ground, but we don't have if is active high/low.

Hori-HRAP4VLX-01.png

Hori RAP4 Premium VLX
=Real Arcade Pro 4 Premium VLX Kuro for PS4 & PS3

SRKTT thread-
http://forums.shoryuken.com/discussion/195793/the-hori-ps4-vlx-thread/p1

Case-
Hori VLX Case (Same as VLX models for PS3/360)
=Sizes - Width = 570mm, Depth = 260mm, Height (including lever) = 140mm
=Weight (5.4kg/11.9lbs)
=Interior of case has plenty of space for mounting PCBs
=PS4 touch panel on back of case

Metal Panels-
+Both top and bottom metal panels

Plexi/Art-
=No default plexi
=Default artwork can leave a sticky residue when removing

Bottom Padding/Feet-
=Padding

Joystick-
=Hori Hayabusa joystick

Buttons-
=Hori Kuro buttons

PCB-
=Insuffiecent testing

Wiring-
=Typical

USB Cable-
=Wire and cord compartment
=Cable length (3m/9.8ft)

Unanswered Questions Due to Insufficient Testing-
To Edit


-

IC: Tek-Case Mini

$
0
0
Good morning all! I have been speaking w/ Art of Tek-innovations.com about building mini portable tek-cases, and he is up to it if enough interest is gathered. Dimensions would be 9.5*7.33*2 which is the same as an Ipad2 vs the current 13.5*8.5*2.25.

case3.jpg

TE S+ SFV PS3/PS4 Thread

$
0
0
Editing the name, because it isn't really about the button placement anymore.

Original post:
The mockups are actually different from the real thing. The mockups cover the bolt at the top with the huge panel. In reality they lower the panel and the buttons/stick as a result - meaning less wrist space.

Mockup on product page
SFV89384-TES-Plus-PS4-002_md.jpg

Reality
topic-03761-7.png

Probably amounts to about a half an inch, but wrist space is wrist space.

Madcatz SE PS3 To PC with PCI USB Card (VIA Chipset)

$
0
0
Hi guys,

I have a ps3 Madcatz SE i want to connect on my pc, i bought a pci usb card with a Via chipset and my buttons works fine but my joystick is not recognise when i move it. I tried the 3 modes (LS, DP, RS) and the result is the same.

Someone got the same issue ?

Thanks in advance guys !

Arcadeshop.de is it a scam store?

$
0
0
Hey boys and girls.

Recently (17 February 2016) I bought 8 sanwa buttons from this website arcadeshop.de and paid them the same day, even though the payment went through only 21 February.

After all this time I've decided ,during this past week, to contact them to get an update on the order and all I got in response was silence.

I'm afraid I'm being scammed.

Is this normal? What can I do?

Thank you.

[Street FIghter V Steam] Does the video settings and resolution affect the gameplay?

$
0
0
Hi, so i recently purchased street fighter v on steam, however my pc can't handle max settings, i get some fps drops and some special abilities cause lag. as far as a i know street fighter iv was capped to 60fps is street fighter v the same? also when i was playing usfv on steam as well, why does my fps go to 140~ when it is capped to 60fps? is that the real fps? does video settings affect the gameplay (inputs and executions) as long as you get a minimum fps of 60?

New RAP 4 Pro kai question

$
0
0
I'm new to this forum so I apologize if this post is in the wrong category or if this question has already been asked . I bought the RAP 4 Pro Kai because I'm handicapped "Quadriplegic" and I don't have very good use of my fingers. I've seen people talk about modifying the buttons and stick on this controller. My question is.,..is there any way to modify the DP,LS,and RS button? Maybe switching it to a toggle switch or something like that. As I said I don't have very good use of my fingers and it is hard for me to switch back and forth . I didn't buy this controller for just fighting games. I bought it to use with every game. And some games you have to switch back and forth. Please remember, I'm a quad so the easier the mod the better. Any help or suggestions would be very much appreciated. Thank you very much

HORI Fighting EDGE

$
0
0
I hope you all caught the unveiling of the Fighting EDGE last Wednesday on Level Up's Wednesday Night Fights!! We've opened up this thread to answer any questions you may have regarding the Fighting EDGE. Hit us up with any questions or feedback you may have!!
Viewing all 5515 articles
Browse latest View live