nominate as an article if this helped you!
Seems pretty self explanatory, but I saw people keep asking for help over the past couple days, so I decided to make this simple faq. Mods please take down if this is a redundant post.
First off, this post assumes you've been able to get past the initial process of making your own artwork and getting some protection on it, whether it be lamilabel or a pre-cut plexi cover.
Please go to TE template thread
if you have not completed this step yet to get the templates and ideas.
User d3v has created a comprehensive starter guide on how to set up a basic template here
For superior plexi products and art orders, head over to Art's Hobbies
OR Art's SRK thread for info first.
Tools needed :
Flathead x2 (large and smaller tip)
Allen key (says size 3 on the one I used)
(Please ignore my custom art top and bezel for now)
Step 1:
Remove the six allen screws which hold in the metal plate to the base.
![TEstick1.jpg]()
Step 2:
Separate the metal plate from the base by holding onto the joystick, while holding this, you can also remove your red bezel at this time so it doesn't get scratched up when u stand up the plate for button and joystick wiring removal.
![TEstick2.jpg]()
if you're planning on painting/dyeing your bezel, now would be the time to do it. I used Krylon Fusion Black with several coats of clear for protection
![TEstick3.jpg]()
Step 3:
Get your larger flathead underneath the joystick mounting plate and you will see the position for it. This will stop the joystick top from spinning freely and you can unscrew it.
![TEstick4.jpg]()
This is the parts you should have so far. The joystick top/ball can be replaced with Sanwa/Seimitsu LB-35, Sanwa LB-30N, and Seimitsu LB-39 among other compatible ones for your choice in color and style.
![TEstick5.jpg]()
Step 4:
Quick Disconnect removal.
Each button is connected to 2x quick disconnects. You're going to want to pull back the sleeve on each of the QD's, then insert your smaller flat head near the top and do a couple small prys, nothing to forceful. It should push out the QD off the buttons enough that you can pull them off without yanking or any excessive force. DO NOT TUG ON THE QD's BY THE WIRE.
![TEstick6.jpg]()
The joystick itself has a plug on it you can similarly slowly push out using ur smaller flat head. This step is optional as its not necessary for the whole metal plate to be out to apply or take off your old artwork, but it does make it easier.
![TEstick7.jpg]()
Step 5:
Button removal.
This is a real bitch the first time, they're in there pretty good. Just slowly work each side of the button, you will see the clips that lock them into place into the metal plate. Trying getting one side and then pushing on the other or rotating the button, eventually you'll get them all to pop out. If you didn't know already, these buttons are Sanwa OBSF snap in 30mm's and can be replaced with any color variant of so and the seimitsu snap-in equivalents.
![TEstick10.jpg]()
Step 6: So after this your metal plate will be free like so
![TEstick8.jpg]()
Peeling the stock artwork is actually quite easy, it's held in by some kind of very weak sticky adhesive and comes off whole without tearing.
![TEstick9.jpg]()
Rewind the process after you get your new artwork on, (I recommend using 3m adhesive spray or similar if you're just using laminated/lamilabeled art work)
so
-snap in buttons
-hook up QDs to buttons
-hook up plug to Joystick
-place joystick hardware and screw in top
-slide in bezel
-slide metal top in on top of bezel
-screw x6 in
-Success
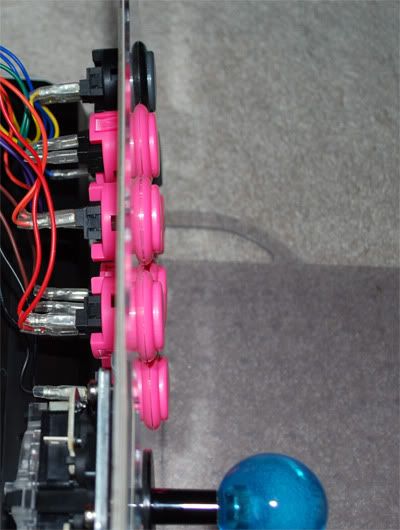
If you're using plexi+art
Your final product should look like this before putting the bezel back in and screwing down everything.
Metal TE plate -> artwork -> arthong plexi -> buttons
Make sure to shave off/grind down the miniature grooves/nubs on snap in buttons as they can crack your plexi when putting them in.
![TEstickplexi.jpg]()
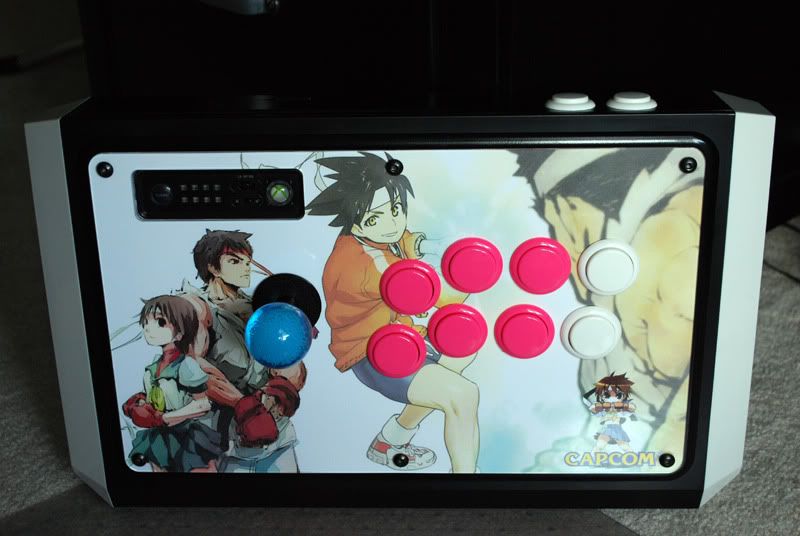
This is my finished one for now.
![finishedTE.jpg]()
PS. In case you didn't make note of the button colors for each set of wiring , here it is :
![button-colors.jpg]()
Seems pretty self explanatory, but I saw people keep asking for help over the past couple days, so I decided to make this simple faq. Mods please take down if this is a redundant post.
First off, this post assumes you've been able to get past the initial process of making your own artwork and getting some protection on it, whether it be lamilabel or a pre-cut plexi cover.
Please go to TE template thread
if you have not completed this step yet to get the templates and ideas.
User d3v has created a comprehensive starter guide on how to set up a basic template here
For superior plexi products and art orders, head over to Art's Hobbies
OR Art's SRK thread for info first.
Tools needed :
Flathead x2 (large and smaller tip)
Allen key (says size 3 on the one I used)
(Please ignore my custom art top and bezel for now)
Step 1:
Remove the six allen screws which hold in the metal plate to the base.

Step 2:
Separate the metal plate from the base by holding onto the joystick, while holding this, you can also remove your red bezel at this time so it doesn't get scratched up when u stand up the plate for button and joystick wiring removal.

if you're planning on painting/dyeing your bezel, now would be the time to do it. I used Krylon Fusion Black with several coats of clear for protection

Step 3:
Get your larger flathead underneath the joystick mounting plate and you will see the position for it. This will stop the joystick top from spinning freely and you can unscrew it.

This is the parts you should have so far. The joystick top/ball can be replaced with Sanwa/Seimitsu LB-35, Sanwa LB-30N, and Seimitsu LB-39 among other compatible ones for your choice in color and style.

Step 4:
Quick Disconnect removal.
Each button is connected to 2x quick disconnects. You're going to want to pull back the sleeve on each of the QD's, then insert your smaller flat head near the top and do a couple small prys, nothing to forceful. It should push out the QD off the buttons enough that you can pull them off without yanking or any excessive force. DO NOT TUG ON THE QD's BY THE WIRE.

The joystick itself has a plug on it you can similarly slowly push out using ur smaller flat head. This step is optional as its not necessary for the whole metal plate to be out to apply or take off your old artwork, but it does make it easier.

Step 5:
Button removal.
This is a real bitch the first time, they're in there pretty good. Just slowly work each side of the button, you will see the clips that lock them into place into the metal plate. Trying getting one side and then pushing on the other or rotating the button, eventually you'll get them all to pop out. If you didn't know already, these buttons are Sanwa OBSF snap in 30mm's and can be replaced with any color variant of so and the seimitsu snap-in equivalents.

Step 6: So after this your metal plate will be free like so

Peeling the stock artwork is actually quite easy, it's held in by some kind of very weak sticky adhesive and comes off whole without tearing.

Rewind the process after you get your new artwork on, (I recommend using 3m adhesive spray or similar if you're just using laminated/lamilabeled art work)
so
-snap in buttons
-hook up QDs to buttons
-hook up plug to Joystick
-place joystick hardware and screw in top
-slide in bezel
-slide metal top in on top of bezel
-screw x6 in
-Success
If you're using plexi+art
Your final product should look like this before putting the bezel back in and screwing down everything.
Metal TE plate -> artwork -> arthong plexi -> buttons
Make sure to shave off/grind down the miniature grooves/nubs on snap in buttons as they can crack your plexi when putting them in.
This is my finished one for now.
PS. In case you didn't make note of the button colors for each set of wiring , here it is :
